Category: Education & Skills

  • Where do flies go in the winter

    Where do flies go in the winter

    Cold weather changes more than the landscape. It also changes where insects spend their time, which is why people often wonder where do flies go in the winter. The short answer is that most flies do not disappear—they either die after laying eggs, survive in a dormant state, or remain active inside warm buildings. Which of these happens depends on the fly species and the local climate.

    The Full Picture

    Flies have developed several ways to survive winter, and not every species follows the same pattern. House flies, one of the insects people see most often, usually seek shelter before temperatures drop too low. They hide in attics, wall spaces, barns, sheds, garages, or other protected places where the cold is less severe. If they find a warm indoor environment (especially one with food and moisture), they may stay active throughout the season.

    Some flies enter a resting state called diapause—a natural pause in development that helps them conserve energy until conditions improve. During this time, they move very little and do not reproduce. Others survive winter as eggs, larvae, or pupae buried in soil, leaf litter, or decaying organic material. When spring brings warmer temperatures, they complete their development and emerge as adult flies.

    And this explains why flies seem to appear overnight once the weather warms. They were already present, hidden in places people rarely notice.

    But climate makes a difference. In regions with mild winters, certain fly species may remain active for much of the year. In colder areas, freezing temperatures reduce adult populations significantly, although sheltered individuals and immature stages often survive.

    The truth is, many people assume flies simply migrate away like birds. They do not. Most species stay close to where they developed, relying on shelter or dormancy instead of long-distance travel.

    Related Questions People Also Ask

    Do flies die every winter?

    Not always. Many adult flies die naturally as temperatures fall, but their eggs or pupae survive until spring. Some adults also live through winter by hiding in protected locations.

    Why do flies suddenly appear in spring?

    Warmer temperatures speed up insect development. Eggs, larvae, and pupae that survived the winter become active, and adult flies emerge within a relatively short period.

    Can flies survive inside a house during winter?

    Yes. Heated homes provide warmth, food, and moisture that allow house flies to remain active even when outdoor temperatures are freezing. Still, this varies depending on the species and the conditions inside the building.

    Real-World Relevance

    Knowing where flies go in the winter helps explain seasonal pest problems. Homeowners can reduce spring infestations by sealing entry points, removing food waste, and cleaning areas where flies breed before cold weather arrives. Farmers and pet owners also benefit because managing organic waste limits places where fly larvae can survive. So, understanding the fly life cycle makes prevention much more effective than simply dealing with adult flies after they appear.

    Closing

    Flies do not vanish when winter arrives. Most survive by hiding, entering dormancy, or remaining in warm indoor spaces, while others overwinter as eggs or pupae until spring. If you notice flies returning every year, inspect potential breeding sites and entry points around your home. Preventing shelter and reproduction is usually the most effective long-term solution.

  • Does creatine make you pee a lot

    Does creatine make you pee a lot

    Every gym has that one piece of advice that gets repeated so often it starts sounding like fact. One of the biggest myths surrounding creatine is that it forces people to spend all day running to the bathroom. The concern is understandable because creatine changes how muscles store water, making many people wonder, does creatine make you pee a lot or is that simply a misunderstanding of how the supplement works?

    The answer is more nuanced than a simple yes or no. For most healthy adults, creatine does not directly increase urination. Some people may notice temporary changes when they first begin taking it, but those changes often have more to do with increased water intake, exercise habits, or individual hydration levels than the supplement itself. Understanding why this happens can help you use creatine with confidence instead of relying on common fitness myths.

    Background and Context

    Creatine is one of the most researched sports supplements available today. It occurs naturally in foods such as beef, pork, and fish, while the body also produces small amounts in the liver, kidneys, and pancreas. Around 95% of the body’s creatine is stored inside skeletal muscles, where it helps regenerate ATP, the primary source of energy for short bursts of intense activity.

    When people supplement with creatine monohydrate, muscle cells gradually store more creatine along with additional intracellular water. That shift often leads to a small increase in body weight during the first few weeks (usually between one and three pounds). But this water moves into muscle tissue rather than being flushed out through urine.

    And that distinction matters. Water held inside muscle cells supports normal muscle function instead of acting like a diuretic. Unlike caffeine or certain medications, creatine does not stimulate the kidneys to produce extra urine.

    Many people also begin drinking significantly more water once they start creatine because they have heard they should stay hydrated. That increased fluid intake—not creatine itself—is often the reason bathroom visits become more frequent.

    Does Creatine Make You Pee a Lot? The Real Answer

    Current scientific research does not show that creatine causes excessive urination in healthy individuals. Clinical studies involving athletes and recreational exercisers have consistently found that creatine supplementation is safe when taken at recommended doses.

    But experiences can vary.

    Someone following a traditional loading phase of 20 grams daily for five to seven days may notice their body adjusting differently than someone taking a standard maintenance dose of 3 to 5 grams per day. Even then, frequent urination is usually linked to drinking more fluids rather than the creatine itself.

    The truth is, many first-time users intentionally double their normal water intake after reading advice online. Naturally, consuming several extra bottles of water each day results in more trips to the restroom.

    There are other reasons people may think creatine is responsible:

    • Intense exercise increases thirst, leading to greater fluid consumption.
    • Hot weather causes changes in hydration habits throughout the day.
    • High-protein diets often accompany creatine supplementation and may alter drinking patterns.

    So the timing creates confusion. People begin creatine, start exercising harder, drink more water, and assume the supplement alone caused the change.

    Research also indicates that creatine does not damage healthy kidneys when used according to recommended guidelines. Still, anyone with existing kidney disease or other medical conditions should speak with a healthcare professional before starting supplementation (because personal medical history always matters).

    Practical Tips for Everyday Use

    If you are starting creatine, focus on consistency instead of overcomplicating the process.

    Most experts recommend taking 3 to 5 grams of creatine monohydrate daily. Loading phases are optional because muscle creatine stores will still become saturated over time without large initial doses.

    So drink enough water to satisfy your thirst and support your activity level, but avoid forcing excessive amounts simply because you are taking creatine. Clear or very pale urine generally indicates adequate hydration, while dark yellow urine may suggest you need more fluids.

    Pay attention to your overall routine as well. Increased urination accompanied by extreme thirst, unexplained weight loss, burning during urination, or persistent discomfort may point to something unrelated to creatine. In those situations, seeking medical advice is the smarter choice.

    Here’s the thing—many experienced lifters take creatine for years without noticing any unusual changes in bathroom frequency. Realistically, hydration habits explain far more than the supplement itself.

    What to Know Going Forward

    Creatine remains one of the most effective and well-studied supplements for improving strength, power, and high-intensity exercise performance. The available evidence does not support the belief that it acts as a diuretic or routinely makes healthy users urinate more often.

    Understanding how creatine works helps separate myths from facts. It encourages muscles to retain water inside the cells rather than increasing fluid loss. If your bathroom visits increase after starting creatine, reviewing how much water you are drinking often provides the answer.

    Small differences between individuals are normal, but they should not be mistaken for evidence that creatine itself causes excessive urination.

    Final Thoughts

    Questions about supplements are worth asking because small misunderstandings can spread quickly through gyms and social media. When it comes to whether creatine makes you pee a lot, current research points toward a reassuring answer: for most healthy people, it does not.

    If you decide to use creatine, choose a high-quality creatine monohydrate supplement, follow the recommended dosage, stay reasonably hydrated, and monitor how your own body responds. Building habits based on evidence instead of myths is usually the best strategy for long-term fitness success.

  • Remove nth node from end of list

    Remove nth node from end of list

    When programmers first encounter linked lists, the challenge rarely comes from storing data. The real difficulty appears when the list needs to change while preserving every connection. That is exactly why remove nth node from end of list has become one of the most common coding interview questions across platforms like LeetCode and technical hiring assessments. It tests far more than syntax. It measures whether you understand pointer movement, edge cases, and efficient algorithm design under pressure. A solution that works for most inputs is not enough because linked lists expose weaknesses that arrays often hide. Learning this problem thoroughly builds intuition you can reuse in dozens of related linked list challenges, making it a valuable exercise beyond interviews alone.

    Background and context

    Linked lists behave differently from arrays because each element stores a reference to the next node instead of occupying consecutive memory locations. That single design choice changes how deletion works. In an array, removing an element often means shifting values. In a linked list, the data usually stays where it is—the references simply change.

    The challenge becomes more interesting when the node to delete is counted from the end rather than the beginning. Imagine a list containing:

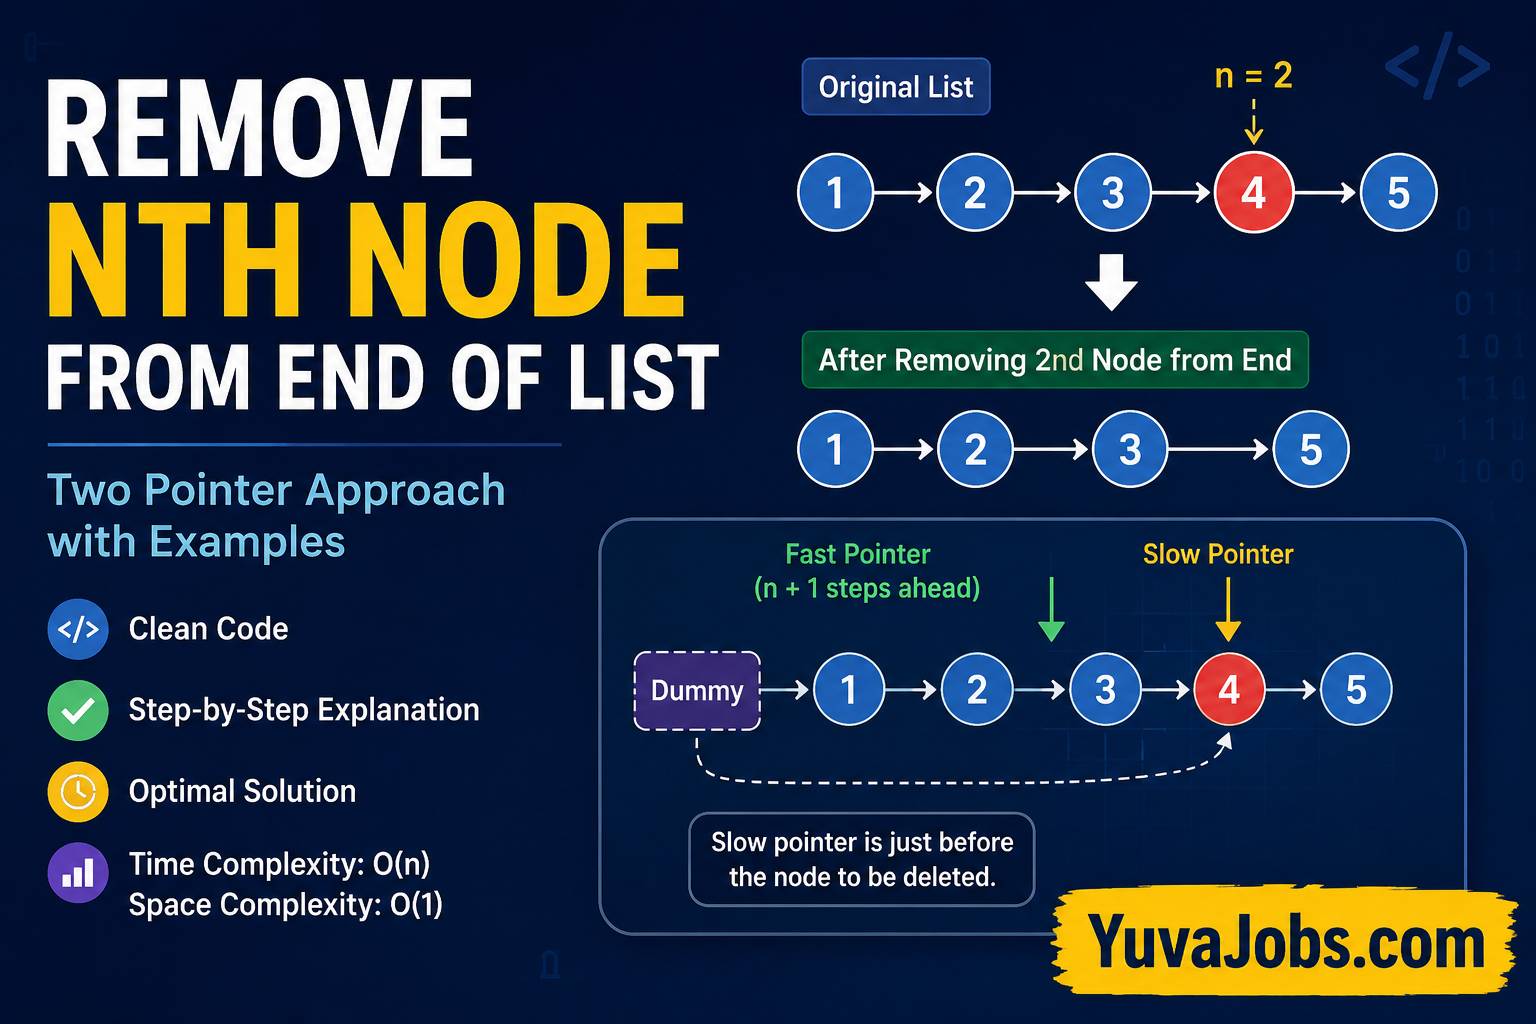
    1 → 2 → 3 → 4 → 5

    If the value of n is 2, the second node from the end is 4, producing:

    1 → 2 → 3 → 5

    But deleting the fifth node from the end removes the head itself. That special case catches many beginners because there is no previous node before the head.

    And this is why interviewers like the problem. They want to see whether candidates think beyond the obvious implementation. The best solutions handle empty lists, single-node lists, and cases where the first element disappears without adding unnecessary complexity.

    The problem also introduces an idea that appears repeatedly in algorithms: using two pointers moving through the same data structure at different positions (an approach sometimes called the fast-and-slow pointer technique). Once understood, that pattern becomes useful for detecting cycles, finding middle nodes, and solving many other linked list questions.

    The main substance

    A beginner often solves this problem with two complete traversals. During the first traversal, the algorithm counts the total number of nodes. During the second, it calculates which node should be removed from the beginning.

    For example:

    Input:

    1 → 2 → 3 → 4 → 5

    n = 2

    Step 1:
    Count total nodes = 5.

    Step 2:
    Target position from the front:

    5 - 2 = 3

    Move to the third node, then adjust the next pointer so node 3 points directly to node 5.

    This approach works well, but it requires traversing the linked list twice.

    A more elegant solution uses two pointers.

    Create a temporary dummy node before the head (this small addition dramatically simplifies deleting the first node). Place both the fast and slow pointers at the dummy node. Move the fast pointer ahead by n + 1 positions. After that, move both pointers together until the fast pointer reaches the end.

    At that moment:

    • The slow pointer sits immediately before the node that should be deleted.
    • Updating one pointer removes the target node.
    • The entire operation finishes in one traversal.

    Consider this example:

    Dummy → 1 → 2 → 3 → 4 → 5

    For n = 2:

    Move fast four steps:

    Fast → 4
    Slow → Dummy

    Move both pointers together:

    Fast → End
    Slow → 3

    Since slow points to node 3, changing:

    3.next = 5

    removes node 4.

    The time complexity is O(n) because every node is visited at most once.

    The space complexity remains O(1) since no extra data structure grows with the input size.

    Here is a commonly accepted implementation in C++:

    class Solution {
    public:
        ListNode* removeNthFromEnd(ListNode* head, int n) {
            ListNode* dummy = new ListNode(0);
            dummy->next = head;
    
            ListNode* fast = dummy;
            ListNode* slow = dummy;
    
            for(int i = 0; i <= n; i++) {
                fast = fast->next;
            }
    
            while(fast != NULL) {
                fast = fast->next;
                slow = slow->next;
            }
    
            slow->next = slow->next->next;
    
            return dummy->next;
        }
    };

    But there’s a small caveat (and experienced developers notice it quickly). If the input constraints allow invalid values of n, additional checks become necessary to avoid dereferencing a null pointer. Competitive programming platforms usually guarantee valid input, while production software often cannot make that assumption.

    The truth is, interviewers generally care less about memorizing this exact code than about understanding why the two-pointer gap works.

    Practical angle

    Many developers dismiss linked list questions because modern software relies heavily on arrays, vectors, and dynamic collections. Realistically, that misses the broader lesson.

    The underlying thinking behind this problem appears in production systems more often than the linked list itself.

    Database engines use pointer-like structures internally. Operating systems manage linked data structures in memory allocation. Browser rendering engines connect objects through references. Even cache implementations frequently combine linked lists with hash tables to build efficient Least Recently Used (LRU) caches.

    And once you become comfortable maintaining a fixed distance between two pointers, several well-known interview problems become much easier. These include:

    • Finding the middle node without counting every element first.
    • Detecting loops using Floyd’s Cycle Detection Algorithm.
    • Reversing nodes in groups.
    • Reordering linked lists while preserving existing connections.

    For coding interviews, practice should extend beyond writing a correct answer. Spend time drawing each pointer movement on paper. Many candidates discover bugs visually long before running the code.

    Or consider explaining the algorithm aloud while solving it. Interviewers often evaluate communication alongside technical accuracy, especially during live coding sessions.

    One more practical habit helps: test unusual inputs.

    • A single-node linked list.
    • Removing the head.
    • Removing the last node.
    • A list with only two elements.
    • The smallest valid value of n.
    • The largest valid value of n.

    Those cases expose mistakes that ordinary examples rarely reveal.

    What to know going forward

    Understanding this problem opens the door to a wider family of linked list algorithms. Instead of memorizing isolated solutions, focus on the recurring patterns behind them. The dummy node technique reduces special-case logic. Maintaining a fixed pointer gap eliminates extra traversals. Careful pointer updates prevent memory and reference errors.

    So each time you practice another linked list problem, ask yourself whether counting nodes is actually necessary. Often, there is a smarter traversal waiting to be discovered.

    Programming interviews also evolve. While companies may change specific questions, they continue testing reasoning, efficiency, and clean code. Mastering this challenge provides experience with all three qualities in a single exercise, making the effort worthwhile even if the exact question never appears again.

    Closing

    Few algorithm problems pack as many lessons into such a short piece of code as remove nth node from end of list. It teaches efficient traversal, careful pointer management, thoughtful handling of edge cases, and clean algorithm design without unnecessary memory usage. Instead of memorizing the implementation, spend time understanding why each pointer moves when it does. Your next step should be to solve the problem from scratch, then revisit it a day later without looking at any reference. If the logic still feels natural, you’ve learned far more than one interview question

  • Can ms access query handel chr 10 30 lines

    Can ms access query handel chr 10 30 lines

    Long text stored in a database often looks perfect until a query tries to display it. That’s usually the moment when line breaks disappear, records merge into a single paragraph, or exported files suddenly become difficult to read. Many users searching whether can ms access query handel chr 10 30 lines are not really asking about the Chr(10) function itself. They want to know whether Microsoft Access can safely preserve dozens of line breaks inside a query result without corrupting the data or cutting it short.

    The short answer is yes. Microsoft Access queries can handle Chr(10) across 30 lines—and far beyond that—provided the underlying field type, query expression, forms, reports, and export destination all support multiline text correctly. The real challenge isn’t the query engine. It is understanding where line breaks are preserved, where they are ignored, and how Windows stores them internally.


    Background and Context

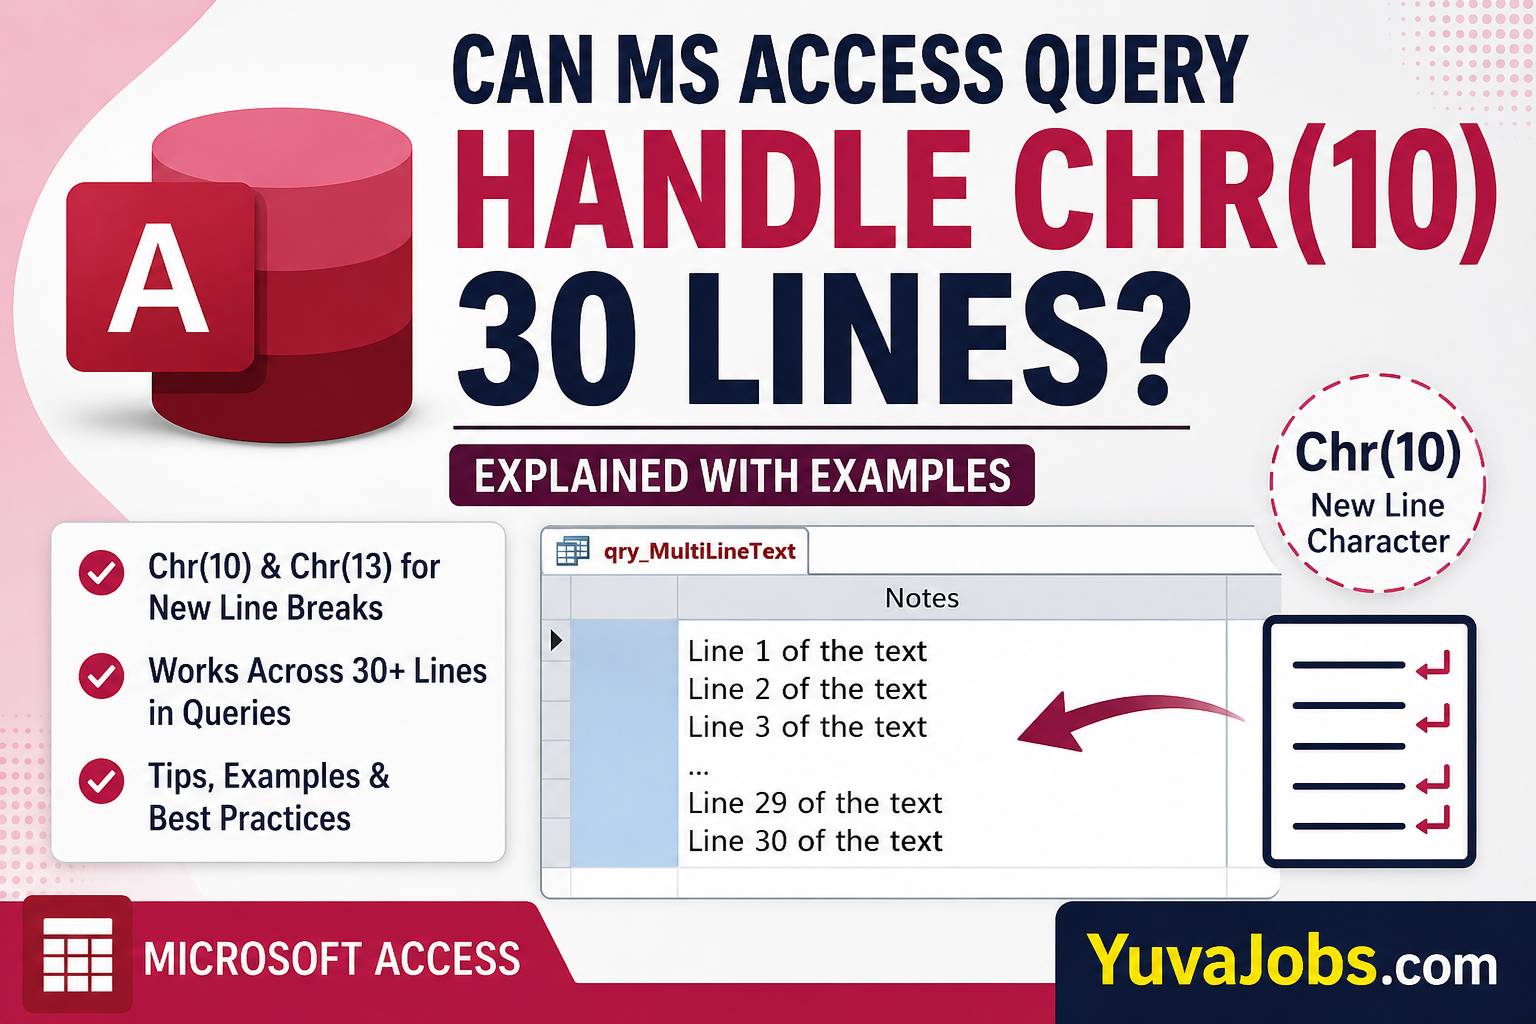
    Text formatting inside databases has always been slightly more complicated than it appears. Most Windows applications treat a new line as two characters instead of one:

    • Chr(13) = Carriage Return (CR)
    • Chr(10) = Line Feed (LF)

    Together they become:

    Chr(13) & Chr(10)

    This combination creates a proper Windows line break.

    And this matters because Microsoft Access was designed around Windows conventions. While Chr(10) alone works in some situations, many controls, reports, and exports expect both characters together.

    Consider a memo stored inside a Long Text field.

    Instead of one paragraph, it may contain:

    First Line
    Second Line
    Third Line
    ...
    30th Line

    The database stores every line break as characters inside the text itself (not as separate rows). When an Access query retrieves that field, it normally returns the entire text exactly as stored.

    But there is one detail many tutorials skip—the display depends on where the query result is viewed. Datasheet View, Forms, Reports, VBA, exports to Excel, and exported CSV files all interpret line breaks differently (and sometimes not at all). That difference often creates the impression that Access removed the formatting when, in reality, another application simply chose not to display it.


    The Main Substance

    The Access query engine has no practical limitation that says “Chr(10) can only appear a certain number of times.” If your field contains 30 line breaks, 100 line breaks, or even several hundred, the query processes the value as text.

    For example:

    SELECT
    "Line 1"
    & Chr(13) & Chr(10)
    & "Line 2"
    & Chr(13) & Chr(10)
    & "Line 3"
    AS Notes;

    The output becomes:

    Line 1
    Line 2
    Line 3

    Now imagine expanding this to 30 lines.

    Line 1
    Line 2
    ...
    Line 30

    Access treats this as one Long Text value.

    But here’s where users often become confused.

    Suppose you build an expression like:

    =[Address1]
    & Chr(13) & Chr(10)
    & [Address2]
    & Chr(13) & Chr(10)
    & [City]

    The query is correct.

    Yet Datasheet View may show everything on one line because row heights do not automatically expand for multiline content. When the same query feeds a report or a multiline textbox on a form, every line appears correctly.

    Another common situation involves replacing text.

    Example:

    Replace([Comments], ";", Chr(13) & Chr(10))

    If the original field contains:

    Apple;Orange;Banana

    The query returns:

    Apple
    Orange
    Banana

    And yes, this works perfectly even if the replacement creates 30 or more separate lines.

    The underlying storage also matters.

    Access field types behave differently:

    Field Type Supports Multiple Lines Recommended
    Short Text Limited by 255 characters No
    Long Text (Memo) Yes Yes
    Calculated Text Depends on result length Sometimes
    Attachment Not applicable No

    A Long Text field can store approximately 65,536 characters for display, while internally Access can manage much larger text depending on version and storage conditions. Thirty lines of ordinary text rarely exceed even a few thousand characters.

    But expressions inside queries have practical limits. Extremely large concatenated expressions may become difficult to maintain, and very complex SQL statements can approach Access expression-size restrictions. That limitation comes from the expression builder rather than the number of Chr(10) characters themselves.

    Here’s the thing: if your query is only generating 30 lines of readable text, you’re operating well within normal Access capabilities.

    Another real-world example appears in email generation through VBA.

    SELECT
    "Dear Customer,"
    & Chr(13) & Chr(10)
    & Chr(13) & Chr(10)
    & "Your order has shipped."
    & Chr(13) & Chr(10)
    & "Tracking Number:"
    & Chr(13) & Chr(10)
    & [TrackingID]

    Developers frequently create emails containing 20–40 formatted lines this way. The query itself presents no problem.


    Practical Angle

    Many Access databases generate invoices, quotations, shipping labels, inspection reports, or audit notes. Those documents often require multiline formatting instead of one continuous paragraph.

    Suppose an employee stores inspection notes like this:

    Machine Started
    Temperature Normal
    Oil Pressure Stable
    Operator Present
    Maintenance Scheduled
    ...

    After thirty separate observations, the field still behaves like ordinary text. A query can retrieve it, append more information, or combine it with other fields without removing the line breaks.

    So if your output looks wrong, the first place to investigate is not the SQL statement.

    Check these items instead:

    • Is the field a Long Text field rather than Short Text?
    • Is the textbox’s Enter Key Behavior set for new lines?
    • Does the control allow multiline display?
    • Is the export destination removing carriage returns?
    • Are you using Chr(10) alone instead of Chr(13) & Chr(10)?

    Realistically, most formatting problems come from reports, forms, or export settings rather than the query engine itself.

    One honest limitation deserves mentioning. If you’re exporting to CSV, many third-party applications treat embedded line breaks differently. Some spreadsheet programs preserve them, while others display everything on one line unless the file is imported with the correct settings. That isn’t an Access defect—it reflects differences in how software interprets text files.


    What to Know Going Forward

    Working with multiline text becomes much easier once you understand the distinction between storing data and displaying it. Access stores line breaks as ordinary characters inside the text field. Queries simply return those characters.

    And when creating formatted output, the safest choice remains:

    Chr(13) & Chr(10)

    rather than using only Chr(10).

    If you’re building reports, automated emails, exported documents, or printable forms, always test the final destination instead of relying only on Datasheet View. The same query may appear different across Access forms, reports, Excel, Word, or PDF exports—even though the stored text never changed.

    That small detail explains many of the “missing line break” problems discussed in Access forums.


    Closing

    Microsoft Access queries can comfortably handle Chr(10) across 30 lines, and in most situations they can manage far more than that without difficulty. The real success comes from pairing the correct field type with proper line break characters and testing how the output is displayed outside the query window. If your multiline text still appears incorrect, inspect the form, report, export format, or destination application before assuming the SQL expression is at fault. That approach saves time and usually reveals the actual source of the problem much faster than rewriting a perfectly valid query.

  • Is ni subjectively the same of all mibs

    Is ni subjectively the same of all mibs

    When people search for “is ni subjectively the same of all mibs”, they are usually trying to understand whether the Network Interface (NI) behaves identically across different Management Information Bases (MIBs) used in networking and SNMP. The wording of the question can be confusing because it mixes two different concepts that operate at different layers of network management. The real issue is whether the data represented by a network interface remains consistent regardless of the MIB that exposes it.

    The short answer is no. A Network Interface is not subjectively or universally the same across all MIBs. While many MIBs reference the same physical or logical interface, each MIB describes it from a different management perspective. Understanding this distinction helps network administrators interpret monitoring data correctly, troubleshoot devices more efficiently, and avoid configuration mistakes.

    Background and Context

    Network management relies heavily on the Simple Network Management Protocol (SNMP), a protocol designed to monitor and manage network devices such as routers, switches, firewalls, servers, and wireless controllers. Rather than exposing every hardware detail directly, SNMP organizes information into structured databases known as Management Information Bases (MIBs).

    Each MIB defines a collection of managed objects identified by Object Identifiers (OIDs). These objects describe different characteristics of a device, ranging from CPU usage and memory consumption to routing tables, environmental sensors, wireless radios, and network interfaces.

    A Network Interface, often abbreviated as NI, represents a communication endpoint on a device. Examples include:

    • Ethernet ports
    • Fiber interfaces
    • VLAN interfaces
    • Loopback interfaces
    • Wireless interfaces
    • Tunnel interfaces

    Here is where confusion often appears. Multiple MIBs can reference the same interface, yet each exposes different attributes.

    For example, the standard IF-MIB focuses on interface statistics such as transmitted packets, received errors, interface speed, operational status, and administrative status. Another vendor-specific MIB may expose temperature readings for the hardware controlling that interface, optical signal levels, or advanced quality metrics.

    And this is exactly why the same interface may appear differently depending on which MIB you query.

    Understanding Why NI Is Not the Same Across All MIBs

    The relationship between interfaces and MIBs is easier to understand when viewed from the perspective of responsibilities rather than duplication.

    Imagine a managed switch with a physical interface called GigabitEthernet1/0/1.

    The IF-MIB may provide:

    Meanwhile, a Cisco-specific MIB might expose:

    A different vendor MIB could instead provide:

    The interface itself has not changed.

    The information being reported has changed because each MIB has its own purpose.

    But there is another layer to consider—interface indexing. Most MIBs identify interfaces using an ifIndex value. Although several MIBs may reference the same ifIndex, they rarely define exactly the same set of objects.

    For example:

    • IF-MIB provides traffic counters.
    • IP-MIB provides IP addressing information.
    • EtherLike-MIB reports Ethernet-specific statistics.
    • RMON MIB collects historical monitoring information.
    • Vendor MIBs expose hardware capabilities unavailable in standard MIBs.

    So the same physical interface becomes a common reference point instead of being duplicated.

    Here’s the thing: thinking of MIBs as different “views” of the same interface is often more accurate than thinking they all describe identical objects.

    One practical example comes from enterprise monitoring systems such as SolarWinds, PRTG, Zabbix, LibreNMS, and Nagios. These platforms frequently query dozens of MIBs simultaneously for one switch port. The monitoring software correlates the returned values using interface indexes and device identifiers rather than assuming every MIB contains identical information.

    Why This Matters in Real Network Administration

    Understanding this distinction affects more than theory.

    Suppose a network administrator notices high packet loss on Interface 5.

    The IF-MIB reports increasing CRC errors.

    Another vendor MIB reports that the optical receive power has dropped below the acceptable threshold.

    An environmental MIB reports elevated temperature inside the switch.

    Viewed separately, these pieces of information seem unrelated.

    Combined, they reveal a failing fiber transceiver.

    And that illustrates why multiple MIBs exist in the first place. Each contributes a different piece of the diagnostic picture.

    Another common scenario involves bandwidth monitoring.

    Traffic graphs often rely exclusively on IF-MIB counters because they are standardized across manufacturers. Yet advanced performance dashboards may combine those counters with vendor-specific latency measurements, queue depths, or Quality of Service statistics.

    Realistically, relying on only one MIB limits the amount of operational insight available.

    There is also a caveat. Not every manufacturer implements every standard MIB completely. Some devices expose only a subset of objects, while others extend them heavily with proprietary MIBs. That means two switches from different vendors may answer the same SNMP query differently even when performing similar networking functions.

    Common Misunderstandings About NI and MIBs

    Several misconceptions appear repeatedly among students and junior network engineers.

    One misunderstanding is believing that every MIB duplicates interface information.

    Instead, MIBs complement each other.

    Another misconception is assuming every interface has identical OIDs across devices.

    Although standard MIBs define fixed object identifiers, vendor-specific MIBs introduce additional branches beneath their enterprise OID tree.

    Some people also believe that vendor MIBs replace standard MIBs.

    They do not.

    Most enterprise devices implement both. Standard MIBs provide interoperability, while proprietary MIBs expose advanced hardware features unavailable through generic SNMP objects.

    Or consider virtual interfaces. VLAN interfaces, VPN tunnels, loopback adapters, and software-defined interfaces often appear alongside physical ports in IF-MIB. Their operational characteristics differ substantially, even though they share the same management framework.

    Practical Takeaways for Students and Network Professionals

    Whether you are studying networking, preparing for certifications, or managing enterprise infrastructure, the relationship between interfaces and MIBs becomes easier once you separate the physical device from the management model.

    Think of the interface as the object being observed.

    Think of each MIB as a specialized report describing one aspect of that object.

    That approach avoids many common mistakes when reading SNMP documentation.

    So if documentation references IF-MIB, EtherLike-MIB, IP-MIB, or a vendor enterprise MIB, remember that they are not competing descriptions. They work together by exposing different operational details of the same network device.

    The truth is that experienced network engineers rarely rely on a single MIB during troubleshooting. They correlate information from multiple sources because network problems usually have more than one contributing factor.

    Closing Thoughts

    The phrase “is ni subjectively the same of all mibs” reflects a reasonable question, even if the wording is uncommon. The answer is that the Network Interface itself can be the same physical or logical component across multiple MIBs, but each MIB represents that interface from a different management perspective. Understanding how these perspectives fit together leads to more accurate monitoring, better troubleshooting, and a deeper understanding of SNMP. As your next step, explore the IF-MIB alongside a vendor-specific MIB for the same device and compare the information they expose. That side-by-side comparison makes the relationship much clearer than theory alone.

  • Jain quiz questions and answers in hindi

    Jain quiz questions and answers in hindi

    हर धार्मिक परंपरा केवल पूजा-पद्धति तक सीमित नहीं होती। उसके भीतर इतिहास, दर्शन, नैतिकता और जीवन जीने की ऐसी समझ छिपी होती है जो पीढ़ियों तक लोगों को प्रभावित करती है। यही कारण है कि jain quiz questions and answers in hindi केवल विद्यार्थियों के लिए नहीं, बल्कि जैन धर्म को गहराई से समझने वाले हर व्यक्ति के लिए उपयोगी साबित होते हैं। विद्यालयों की प्रतियोगिताओं, धार्मिक शिविरों, सामान्य ज्ञान परीक्षाओं और पारिवारिक आयोजनों में ऐसे प्रश्न अक्सर पूछे जाते हैं क्योंकि वे स्मरण शक्ति के साथ-साथ विषय की वास्तविक समझ भी विकसित करते हैं।

    यह लेख केवल प्रश्नों की सूची नहीं है। यहां आपको जैन धर्म से जुड़े प्रमुख तथ्यों, तीर्थंकरों, सिद्धांतों, ग्रंथों, प्रतीकों और व्यवहारिक ज्ञान पर आधारित विस्तृत जानकारी मिलेगी। साथ ही प्रत्येक उत्तर संक्षिप्त और तथ्यात्मक रखा गया है ताकि पढ़ने के बाद आपको अलग स्रोत खोजने की आवश्यकता न पड़े।


    जैन धर्म को समझना क्यों आवश्यक है

    भारत की प्राचीन धार्मिक परंपराओं में जैन धर्म का स्थान अत्यंत सम्मानित माना जाता है। इसकी सबसे बड़ी विशेषता अहिंसा, आत्मसंयम और सत्य के प्रति समर्पण है। जैन धर्म केवल धार्मिक अनुष्ठानों का विषय नहीं बल्कि जीवनशैली का मार्ग भी प्रस्तुत करता है।

    भगवान महावीर ने आत्मा की शुद्धि और कर्मों से मुक्ति का मार्ग बताया। लेकिन उनके पहले भी 23 तीर्थंकर हो चुके थे। इसलिए जब किसी क्विज़ में तीर्थंकरों की संख्या, उनके प्रतीक, जन्मस्थल या सिद्धांत पूछे जाते हैं, तब केवल सामान्य जानकारी पर्याप्त नहीं होती।

    और यही कारण है कि अच्छे क्विज़ प्रश्न केवल याददाश्त नहीं बल्कि समझ की भी परीक्षा लेते हैं।

    जैन समाज में बच्चों के लिए आयोजित ज्ञान परीक्षाएं, पर्युषण पर्व के दौरान होने वाली प्रतियोगिताएं तथा विद्यालयों के धार्मिक सामान्य ज्ञान कार्यक्रम ऐसे प्रश्नों का नियमित उपयोग करते हैं (हालांकि अलग-अलग संस्थाओं के प्रश्नों का स्तर अलग हो सकता है)।

    वास्तविकता यह है कि यदि किसी विद्यार्थी ने जैन धर्म की मूल अवधारणाओं को समझ लिया, तो अधिकांश सामान्य प्रश्नों का उत्तर देना काफी आसान हो जाता है।


    100+ जैन क्विज़ प्रश्न और उत्तर हिंदी में

    नीचे दिए गए प्रश्न आसान, मध्यम और थोड़े उन्नत स्तर के हैं ताकि सभी आयु वर्ग के पाठकों को लाभ मिल सके।

    भाग 1 – सामान्य ज्ञान

    प्रश्न 1: जैन धर्म के 24वें तीर्थंकर कौन थे?
    उत्तर: भगवान महावीर।

    प्रश्न 2: भगवान महावीर का जन्म कहाँ हुआ था?
    उत्तर: कुंडग्राम (वैशाली, बिहार)।

    प्रश्न 3: भगवान महावीर का जन्म किस वर्ष माना जाता है?
    उत्तर: लगभग 599 ईसा पूर्व (श्वेतांबर परंपरा के अनुसार)।

    प्रश्न 4: भगवान महावीर के पिता का नाम क्या था?
    उत्तर: सिद्धार्थ।

    प्रश्न 5: उनकी माता का नाम क्या था?
    उत्तर: त्रिशला।

    प्रश्न 6: जैन धर्म में कुल कितने तीर्थंकर हुए?
    उत्तर: 24।

    प्रश्न 7: प्रथम तीर्थंकर कौन थे?
    उत्तर: भगवान ऋषभदेव (आदिनाथ)।

    प्रश्न 8: जैन धर्म का मुख्य सिद्धांत क्या है?
    उत्तर: अहिंसा।

    प्रश्न 9: जैन धर्म में मोक्ष प्राप्त करने के लिए किन तीन रत्नों का पालन किया जाता है?
    उत्तर: सम्यक दर्शन, सम्यक ज्ञान और सम्यक चरित्र।

    प्रश्न 10: जैन धर्म का प्रमुख प्रतीक क्या माना जाता है?
    उत्तर: अहिंसा का हाथ और स्वस्तिक।


    भाग 2 – तीर्थंकरों से जुड़े प्रश्न

    प्रश्न 11: दूसरे तीर्थंकर कौन थे?
    उत्तर: अजितनाथ।

    प्रश्न 12: तेईसवें तीर्थंकर कौन थे?
    उत्तर: पार्श्वनाथ।

    प्रश्न 13: पार्श्वनाथ का प्रतीक क्या है?
    उत्तर: सर्प।

    प्रश्न 14: महावीर का प्रतीक क्या है?
    उत्तर: सिंह।

    प्रश्न 15: आदिनाथ का प्रतीक क्या है?
    उत्तर: बैल।

    प्रश्न 16: नेमिनाथ का संबंध किस नगर से माना जाता है?
    उत्तर: द्वारका।

    प्रश्न 17: नेमिनाथ का प्रतीक क्या है?
    उत्तर: शंख।

    प्रश्न 18: महावीर ने कितनी आयु में गृह त्याग किया?
    उत्तर: 30 वर्ष।

    प्रश्न 19: उन्हें केवलज्ञान कब प्राप्त हुआ?
    उत्तर: 12 वर्ष की तपस्या के बाद।

    प्रश्न 20: भगवान महावीर का निर्वाण कहाँ हुआ?
    उत्तर: पावापुरी।


    भाग 3 – सिद्धांत आधारित प्रश्न

    प्रश्न 21: पंच महाव्रत कितने हैं?
    उत्तर: पाँच।

    प्रश्न 22: पहला महाव्रत कौन-सा है?
    उत्तर: अहिंसा।

    प्रश्न 23: दूसरा महाव्रत?
    उत्तर: सत्य।

    प्रश्न 24: तीसरा?
    उत्तर: अचौर्य (अस्तेय)।

    प्रश्न 25: चौथा?
    उत्तर: ब्रह्मचर्य।

    प्रश्न 26: पाँचवाँ?
    उत्तर: अपरिग्रह।

    प्रश्न 27: अनेकांतवाद क्या सिखाता है?
    उत्तर: सत्य को अनेक दृष्टिकोणों से देखने की शिक्षा।

    प्रश्न 28: स्याद्वाद किससे संबंधित है?
    उत्तर: सापेक्ष सत्य की अवधारणा।

    प्रश्न 29: कर्म सिद्धांत का मुख्य उद्देश्य क्या है?
    उत्तर: आत्मा को कर्म बंधन से मुक्त करना।

    प्रश्न 30: जैन धर्म में आत्मा को क्या कहा जाता है?
    उत्तर: जीव।


    भाग 4 – धार्मिक पर्व और ग्रंथ

    प्रश्न 31: पर्युषण पर्व कितने दिनों का होता है?
    उत्तर: श्वेतांबर परंपरा में 8 दिन।

    प्रश्न 32: दिगंबर परंपरा का प्रमुख पर्व?
    उत्तर: दशलक्षण पर्व।

    प्रश्न 33: क्षमावाणी दिवस का उद्देश्य क्या है?
    उत्तर: सभी से क्षमा मांगना और क्षमा करना।

    प्रश्न 34: जैन धर्म का प्रमुख मंत्र कौन-सा है?
    उत्तर: नवकार मंत्र।

    प्रश्न 35: नवकार मंत्र में किसी व्यक्ति विशेष का नाम आता है?
    उत्तर: नहीं।

    प्रश्न 36: आगम किससे संबंधित हैं?
    उत्तर: जैन धर्म के प्रमुख ग्रंथ।

    प्रश्न 37: कल्पसूत्र किससे जुड़ा है?
    उत्तर: भगवान महावीर के जीवन और तीर्थंकरों के वर्णन से।

    प्रश्न 38: पर्युषण में कौन-सा ग्रंथ विशेष रूप से पढ़ा जाता है?
    उत्तर: कल्पसूत्र।

    प्रश्न 39: जैन मंदिर में पूजा से पहले क्या बोला जाता है?
    उत्तर: नवकार मंत्र।

    प्रश्न 40: क्षमा मांगने का प्रसिद्ध वाक्य क्या है?
    उत्तर: मिच्छामि दुक्कड़म्।


    भाग 5 – प्रतियोगी परीक्षा स्तर

    प्रश्न 41: जैन धर्म के अनुसार संसार का निर्माता कौन है?
    उत्तर: कोई सृष्टिकर्ता ईश्वर नहीं माना जाता।

    प्रश्न 42: मोक्ष का अर्थ क्या है?
    उत्तर: जन्म-मरण के चक्र से मुक्ति।

    प्रश्न 43: जैन धर्म में कितने लोक माने गए हैं?
    उत्तर: तीन।

    प्रश्न 44: जीव और अजीव में क्या अंतर है?
    उत्तर: जीव चेतन है, अजीव अचेतन।

    प्रश्न 45: तप का उद्देश्य क्या है?
    उत्तर: कर्मों का क्षय।

    प्रश्न 46: संयम का क्या महत्व है?
    उत्तर: आत्मशुद्धि।

    प्रश्न 47: जैन धर्म का सबसे प्रसिद्ध नैतिक सिद्धांत?
    उत्तर: अहिंसा परमो धर्मः।

    प्रश्न 48: किस तीर्थंकर को आदिनाथ कहा जाता है?
    उत्तर: ऋषभदेव।

    प्रश्न 49: पावापुरी किस राज्य में है?
    उत्तर: बिहार।

    प्रश्न 50: महावीर का निर्वाण किस पर्व पर मनाया जाता है?
    उत्तर: दीपावली।

    अगर आप विभिन्न विषयों के क्विज़ हल करके अपनी परीक्षा की तैयारी करना पसंद करते हैं, तो Constitutional Design Class 9 MCQ Online Test भी आपके लिए उपयोगी हो सकता है। इसमें कक्षा 9 के संविधान निर्माण अध्याय से जुड़े महत्वपूर्ण MCQ प्रश्न और उत्तर दिए गए हैं, जो CBSE परीक्षा की तैयारी और त्वरित रिवीजन के लिए बेहद सहायक हैं।


    उन्नत अभ्यास के लिए अतिरिक्त प्रश्न

    यदि आप विद्यालय, कॉलेज, धार्मिक संस्था या ऑनलाइन प्रतियोगिता की तैयारी कर रहे हैं, तो निम्न विषयों पर भी प्रश्न तैयार करें:

    • सभी 24 तीर्थंकरों के नाम क्रमवार।
    • प्रत्येक तीर्थंकर का प्रतीक चिन्ह।
    • जन्मस्थान और निर्वाण स्थल।
    • पंच परमेष्ठी।
    • छह द्रव्य।
    • सात तत्व।
    • नौ पदार्थ।
    • जैन दर्शन में जीव और अजीव।
    • दिगंबर और श्वेतांबर परंपराओं के प्रमुख अंतर।
    • प्रमुख जैन तीर्थ जैसे शत्रुंजय, सम्मेद शिखरजी, श्रवणबेलगोला और रणकपुर।
    • प्रसिद्ध आचार्य एवं उनके योगदान।
    • जैन साहित्य और आगम पर आधारित प्रश्न।

    और यदि आप प्रतियोगी क्विज़ तैयार कर रहे हैं, तो केवल तथ्य याद करने के बजाय उनके पीछे का संदर्भ भी समझें। उदाहरण के लिए, अनेकांतवाद का सिद्धांत आधुनिक संवाद और मतभेदों को समझने में भी उपयोगी माना जाता है—यह केवल धार्मिक विचार नहीं बल्कि तर्क और सहिष्णुता का दृष्टिकोण भी प्रस्तुत करता है।


    जैन क्विज़ की तैयारी कैसे करें

    अच्छे अंक केवल अधिक प्रश्न याद करने से नहीं आते। सही तैयारी का तरीका अलग होता है।

    सबसे पहले 24 तीर्थंकरों का क्रम याद करें। इसके बाद उनके प्रतीक, जन्मस्थान और विशेष घटनाओं को जोड़कर पढ़ें ताकि जानकारी लंबे समय तक याद रहे।

    But केवल रटने पर निर्भर रहने से कठिन प्रश्नों में परेशानी हो सकती है। यदि आप पंच महाव्रत, त्रिरत्न, अनेकांतवाद और कर्म सिद्धांत जैसी मूल अवधारणाओं को समझ लेते हैं, तो नए प्रकार के प्रश्नों का उत्तर देना भी आसान हो जाता है।

    स्कूलों और धार्मिक शिविरों में अक्सर मॉक क्विज़ आयोजित किए जाते हैं। वहां समय सीमा के भीतर उत्तर देने का अभ्यास आत्मविश्वास बढ़ाता है।

    And नियमित पुनरावृत्ति सबसे प्रभावी तरीका है। सप्ताह में एक बार स्वयं टेस्ट लें और जिन प्रश्नों में गलती हो, उन्हें अलग सूची में लिखकर दोबारा पढ़ें।

    ध्यान रखें कि कुछ ऐतिहासिक तिथियों या परंपरागत मान्यताओं में श्वेतांबर और दिगंबर परंपराओं के अनुसार अंतर मिल सकता है। इसलिए यदि प्रश्न किसी विशेष परंपरा पर आधारित हो, तो उसी संदर्भ में उत्तर देना चाहिए।


    आगे के लिए उपयोगी जानकारी

    जैन धर्म पर आधारित प्रश्न समय के साथ बदल सकते हैं, खासकर जब प्रतियोगिताओं का स्तर बढ़ता है। इसलिए केवल पुराने प्रश्नपत्रों तक सीमित रहना पर्याप्त नहीं होता।

    So अपने अध्ययन में इतिहास, दर्शन, धार्मिक ग्रंथ और प्रमुख तीर्थस्थलों को भी शामिल करें। इससे आपकी समझ व्यापक होगी और वस्तुनिष्ठ प्रश्नों के साथ वर्णनात्मक उत्तर लिखना भी आसान रहेगा।

    यह भी ध्यान रखें कि विश्वसनीय पुस्तकों, जैन संस्थाओं द्वारा प्रकाशित अध्ययन सामग्री और प्रमाणित शैक्षिक स्रोतों से तैयारी करना हमेशा बेहतर रहता है। गलत या अपूर्ण जानकारी कई ऑनलाइन स्रोतों पर मिल सकती है, इसलिए तथ्यों का मिलान करना एक अच्छी आदत है।


    समापन

    जैन धर्म का अध्ययन केवल धार्मिक ज्ञान तक सीमित नहीं है। यह आत्मसंयम, अहिंसा, सत्य और सह-अस्तित्व जैसे मूल्यों को समझने का अवसर भी देता है। यदि आप jain quiz questions and answers in hindi की तैयारी व्यवस्थित तरीके से करते हैं, तो विद्यालयी प्रतियोगिताओं, सामान्य ज्ञान परीक्षाओं और धार्मिक आयोजनों में बेहतर प्रदर्शन कर सकते हैं। अगला कदम यह रखें कि आज सीखे गए 50 प्रश्नों का स्वयं अभ्यास करें और फिर 24 तीर्थंकरों, उनके प्रतीकों तथा पंच महाव्रत पर आधारित अपना छोटा क्विज़ तैयार करें। यही अभ्यास लंबे समय तक ज्ञान को मजबूत बनाए रखता है


  • Season carbon steel after blueing in stove

    Season carbon steel after blueing in stove

    A freshly blued carbon steel surface often looks finished, but appearance and long-term protection are not the same thing. Many people discover this after seeing orange spots appear only days later, especially if the metal is exposed to humidity or cooking oils. That is why learning how to season carbon steel after blueing in stove matters. Blueing creates a controlled oxide layer that slows corrosion, while seasoning adds a polymerized oil coating that improves rust resistance and creates a tougher working surface. When both processes are done correctly, they complement each other instead of competing. Understanding how heat, oil selection, and timing work together makes the difference between a finish that lasts for years and one that begins to fail after only a few uses.

    Background and Context

    Blueing and seasoning are often confused because both involve heat and both change the appearance of steel. They serve different purposes.

    Blueing forms a layer of black iron oxide (magnetite) on the surface. This layer offers better corrosion resistance than bare steel but remains relatively thin. It should not be viewed as a complete barrier against moisture. In practical workshop conditions, a blued surface still requires oil or wax for lasting protection.

    Seasoning works differently. Heat causes certain oils to polymerize into a hard, bonded layer that clings tightly to the steel. This coating acts as an additional shield against moisture while also reducing sticking if the steel is used for cookware.

    The order matters. Blue first, season afterward.

    And that sequence is more than tradition—it allows the oxide layer to develop before oil permanently bonds to the surface. If seasoning comes first, blueing temperatures will simply destroy the oil coating.

    Many experienced blacksmiths and restoration specialists use stove-top heating because it provides steady, controllable heat without requiring industrial equipment. A household gas burner works well for smaller pieces, while a larger propane burner can handle bigger carbon steel items (provided safe ventilation is available).

    The truth is, most failures blamed on seasoning actually begin with poor surface preparation. Tiny traces of grease, fingerprints, polishing compound, or moisture interfere with both blueing and polymerization.

    The Main Substance

    Preparation begins with cleaning. Degrease the carbon steel thoroughly using acetone, denatured alcohol, or another residue-free solvent. Any contamination left behind may produce uneven blueing or blotchy seasoning.

    Once the steel has been blued and allowed to cool naturally, inspect the finish carefully. A uniform dark blue or black color indicates that the oxide layer formed evenly. Small streaks or rainbow colors often suggest uneven heating rather than permanent defects.

    Now comes the seasoning stage.

    Heat the steel gradually on the stove until it reaches roughly 400°F to 475°F (205°C to 245°C). Exact temperature depends on the oil being used, but the goal is to exceed the oil’s smoke point without overheating the steel.

    Apply only a very thin coat of oil.

    That word—thin—matters more than the type of oil itself.

    Excess oil creates sticky patches instead of forming a hard coating. Wipe the surface until it almost appears dry before returning it to the heat.

    Common seasoning oils include:

    • Grapeseed oil because of its relatively high smoke point and ability to build thin layers.
    • Refined canola oil, widely used for carbon steel cookware due to its availability and consistent polymerization.
    • Flaxseed oil, which creates a very hard finish but can become brittle if applied too heavily.
    • Soybean oil, another popular option among cookware manufacturers.

    As the steel heats, the oil begins smoking. This is expected. Smoke gradually decreases as polymerization progresses, leaving behind a bonded protective layer.

    Allow the steel to cool naturally before repeating the process.

    Three to five light coats generally outperform one thick coat. Each layer strengthens the previous one, creating better durability and a more even appearance.

    But overheating creates its own problems. Temperatures well above seasoning range may burn away fresh polymer layers or produce ash-like residue that weakens the finish. A moderate, controlled heating cycle almost always produces better results than maximum heat.

    Real workshop experience shows another detail many guides overlook: edges usually season more quickly than flat surfaces because they heat faster. Rotating the workpiece during heating helps maintain consistency (especially on thicker carbon steel plates).

    If the finish appears streaky after cooling, resist the temptation to strip everything immediately. One additional thin seasoning cycle often blends minor inconsistencies into a uniform coating.

    Practical Angle

    Different projects benefit from seasoning in different ways.

    For carbon steel cookware, seasoning creates the familiar dark cooking surface that improves with repeated use. Every cooking session involving moderate amounts of oil continues building protection, assuming acidic foods are not left sitting for extended periods.

    Knives present a different situation. Full seasoning is rarely applied to cutting edges because it quickly wears away during sharpening and use. Instead, lightly oiling the blade after blueing is often the preferred maintenance approach.

    Workshop tools such as hammers, vises, punches, and hand planes gain extra corrosion resistance from seasoning, particularly in humid garages where condensation forms overnight.

    So storage conditions matter just as much as finishing technique.

    Even a perfectly seasoned surface benefits from being kept dry. Long-term exposure to standing water, salty air, or harsh chemicals eventually overcomes both the oxide layer and polymerized coating.

    Here’s the thing—seasoning is not permanent. Heavy scrubbing, aggressive solvents, metal polishing compounds, or abrasive pads slowly remove the protective layer. Fortunately, maintenance is simple. Cleaning the surface gently and applying another light seasoning cycle restores protection without repeating the entire blueing process.

    One limitation deserves mention. If blueing itself failed because of contamination, incorrect temperatures, or poor steel quality, seasoning cannot repair that underlying problem. It improves protection, but it cannot replace a properly formed oxide layer.

    What to Know Going Forward

    Understanding the relationship between blueing and seasoning helps set realistic expectations.

    Blueing slows corrosion by altering the steel surface. Seasoning builds an additional protective layer through polymerized oil. Together they provide noticeably better durability than either process alone.

    And patience usually produces better results than rushing from one heating cycle to the next. Thin oil applications, gradual heating, and complete cooling between coats consistently outperform shortcuts.

    Maintenance also becomes easier over time. Small scratches or worn areas rarely require stripping the entire piece. Local cleaning followed by another seasoning coat often restores both appearance and protection with minimal effort.

    Whether working on cookware, workshop tools, or decorative carbon steel projects, the same principles remain reliable: clean thoroughly, heat evenly, apply very little oil, and repeat until the finish develops naturally.

    Closing

    A good finish on carbon steel is built in layers rather than achieved in one perfect heating cycle. Blueing provides the foundation, while seasoning strengthens that foundation against everyday wear and moisture. When both are done with care, the steel develops a rich appearance along with practical protection that improves through regular maintenance. The next time you finish a blued carbon steel project, spend a little extra time on careful seasoning in the stove. Those additional thin coats often determine whether the surface stays beautiful for months or continues performing well for many years.

  • The fantastic four first steps sequel fancast

    The Fantastic Four First Steps Sequel Fancast

    Every successful superhero movie leaves behind one lingering conversation long after the credits roll: who should appear next? That discussion has already begun around the fantastic four first steps sequel fancast, even before audiences know exactly where Marvel Studios plans to take its newest version of Marvel’s First Family. Fans are not simply guessing famous names for the sake of headlines. Instead, they’re trying to predict which performers could naturally fit the expanding Marvel Cinematic Universe while honoring decades of comic book history.

    A strong fancast is more than celebrity wish fulfillment. It considers acting range, chemistry, age, franchise longevity, and the direction Marvel Studios has established over the last several phases. Some choices feel inevitable, while others are surprisingly convincing once fans connect the dots. The most interesting conversations aren’t about replacing the existing cast—they’re about building the world around them with villains, allies, cosmic beings, and memorable supporting characters capable of carrying multiple films.

    Background and Context

    Marvel’s Fantastic Four has always been larger than a single superhero team. Since their comic debut in 1961 by Stan Lee and Jack Kirby, Reed Richards, Sue Storm, Johnny Storm, and Ben Grimm have introduced readers to some of Marvel’s biggest scientific discoveries, cosmic adventures, alternate dimensions, and legendary villains.

    That history matters because a sequel naturally expands rather than repeats the original formula. Instead of focusing only on the team’s origin, future films can explore deeper relationships with characters like Silver Surfer, Doctor Doom, Franklin Richards, Valeria Richards, Galactus, Molecule Man, Annihilus, and the Inhumans (although rights and continuity always influence Marvel’s plans).

    Marvel Studios has become increasingly careful when selecting actors for long-term franchises. The company now looks beyond immediate popularity, choosing performers capable of evolving over multiple appearances across films and Disney+ series. And that strategy affects every serious fancast because availability, chemistry, and age all become practical considerations—not just fan excitement.

    Realistically, no fancast can perfectly predict Marvel’s decisions. The studio often surprises audiences with casting choices that initially seem unexpected before becoming widely praised.

    The Main Substance

    One of the biggest names consistently mentioned for a sequel is Doctor Doom. Many fans believe Marvel should avoid rushing Victor Von Doom into the first movie, allowing the sequel to fully establish him as one of the MCU’s defining antagonists.

    Doctor Doom – Cillian Murphy

    Cillian Murphy brings quiet intelligence, emotional restraint, and intimidating screen presence. Rather than portraying Doom as an angry dictator, he could emphasize Victor’s brilliance and wounded pride. That balance has made Doom one of Marvel’s greatest villains for decades.

    Murphy also excels at subtle performances where every expression carries weight—a quality that suits a character hiding behind an iconic metal mask.

    Silver Surfer – Bill Skarsgård

    Bill Skarsgård has demonstrated remarkable physical acting abilities throughout his career. Silver Surfer speaks relatively little compared with most Marvel heroes, making body language, voice control, and emotional subtlety especially valuable.

    His ability to portray loneliness and internal conflict fits Norrin Radd’s tragic journey almost perfectly.

    Franklin Richards – Roman Griffin Davis (Future Timeline)

    If Marvel introduces Franklin Richards after a time jump or multiverse storyline, Roman Griffin Davis has the dramatic ability to portray extraordinary intelligence mixed with emotional vulnerability.

    Franklin is not simply Reed and Sue’s son. In Marvel Comics, he eventually becomes one of the most powerful reality-manipulating beings ever created.

    Molecule Man – Paul Dano

    Paul Dano thrives when portraying intellectually gifted yet emotionally unstable characters. Owen Reece requires exactly that balance.

    Unlike physically imposing villains, Molecule Man represents enormous cosmic danger hidden beneath an ordinary appearance.

    Annihilus – Doug Jones (Performance Capture)

    Doug Jones has spent decades bringing elaborate creature performances to life. His experience with motion capture and heavy prosthetics makes him an excellent candidate for portraying Annihilus, ruler of the Negative Zone.

    And his physical storytelling would help distinguish Annihilus from Marvel’s previous CGI-heavy antagonists.

    Alicia Masters – Thomasin McKenzie

    Ben Grimm’s emotional journey depends heavily on Alicia Masters. Thomasin McKenzie consistently delivers compassionate performances without becoming sentimental.

    Their relationship works because Alicia sees Ben’s humanity instead of his rocky appearance—a dynamic that grounds even the biggest cosmic adventures.

    Namor Alliance or Rivalry

    Although Namor has already entered the MCU, a Fantastic Four sequel could explore his complex relationship with Sue Storm and Reed Richards.

    Rather than recasting, Marvel could expand existing continuity by giving Namor a larger political role that complicates Earth’s response to new cosmic threats.

    Here’s the thing: the strongest sequel may not depend on introducing dozens of new characters. Sometimes giving one iconic villain enough screen time produces a stronger story than crowding the film with multiple introductions.

    Practical Angle

    Fans enjoy fancasting because it encourages deeper thinking about storytelling rather than simply predicting celebrity announcements. Looking at acting styles, previous performances, and franchise needs reveals why certain names continue appearing across online discussions.

    Marvel’s own casting history supports this approach. Robert Downey Jr., Chris Evans, Tom Hiddleston, and Elizabeth Olsen were not necessarily the first names casual audiences expected before their casting announcements. Their performances ultimately mattered far more than early public reaction.

    But casting also depends on factors audiences rarely see. Scheduling conflicts, long-term contracts, physical demands, salary negotiations, and creative direction all influence final decisions. An actor who seems perfect on paper may never receive an offer simply because production timelines do not align.

    For readers following MCU developments, separating rumors from speculation is equally valuable. Social media frequently presents fan-created posters as genuine leaks, even though many originate from digital artists rather than studio insiders.

    Watching interviews with actors, following official Marvel announcements, and understanding comic storylines provides a far stronger foundation than relying on viral rumors alone.

    What to Know Going Forward

    Marvel Studios appears committed to making Fantastic Four a cornerstone of its next era, especially as larger multiverse stories continue unfolding. That gives future sequels tremendous flexibility when introducing iconic characters who have waited years for proper cinematic adaptations.

    So the most believable fancasts prioritize longevity over immediate star power. Actors who can realistically appear across several interconnected films often make more sense than blockbuster names whose schedules are already packed.

    Audience expectations will continue evolving after the first movie releases because performances naturally reshape fan opinion. Characters who initially receive little attention sometimes become breakout favorites, changing which supporting heroes and villains deserve expanded roles.

    One honest caveat remains: Marvel frequently protects casting information with extraordinary secrecy. Even widely accepted industry rumors can prove completely inaccurate until official announcements arrive.

    Closing

    The excitement surrounding the fantastic four first steps sequel fancast reflects something larger than celebrity speculation. Fans recognize that Fantastic Four stories introduce some of Marvel’s richest characters, most imaginative locations, and greatest long-term villains. Thoughtful casting could shape the MCU for the next decade rather than a single sequel.

    The smartest next step is to compare potential actors with the comic versions they would portray instead of focusing only on popularity. That approach usually produces fancasts that age remarkably well—and occasionally predicts Marvel’s next inspired casting decision before the studio makes it official.

  • The fantastic four first steps sequel fancast

    You are an expert SEO content writer. Your goal is a 1200+ word article that ranks in Google Top 10, passes every AI detector, and genuinely helps the reader.

    Title: the fantastic four first steps sequel fancast
    Category: Education &amp; Skills
    Intent: informational

    — WRITER PERSONA —
    You are a well-researched, knowledgeable author writing on a topic you understand deeply. Your credibility comes from accuracy, nuance, and genuine depth — not personal stories or self-promotion. Cover the topic so completely that the reader has no reason to search anywhere else.

    — EEAT REQUIREMENTS —
    EEAT for this article:
    – Experience: where relevant, describe how this topic plays out in real situations — concrete, not hypothetical
    – Expertise: include specific facts, named examples, accurate details that prove depth of knowledge
    – Authoritativeness: cover multiple angles of the topic — don&#039;t just answer the surface question
    – Trust: acknowledge complexity or nuance honestly — oversimplification destroys trust

    — HUMAN WRITING RULES —
    HUMAN WRITING RULES — these are not optional:
    – Your intro must NOT start with the keyword, a question, or &quot;Are you…&quot; / &quot;Have you ever…&quot; / &quot;If you&#039;re looking for…&quot;
    – Come at the intro from an unexpected angle — the one angle no other article on this topic uses
    – Vary paragraph length deliberately: some 1 sentence, some 4 sentences, never all the same
    – Vary sentence rhythm: short. Then a longer one that builds on it with more detail and context. Then short again.
    – Never write three paragraphs that open with the same grammatical structure
    – Start at least 3 sentences in the article with &quot;And&quot;, &quot;But&quot;, &quot;Or&quot;, or &quot;So&quot;
    – Use one em dash construction and one parenthetical aside per major section
    – No symmetrical lists anywhere — if you have 3 points, make them unequal in length and depth
    – One place in the article, include a mild honest opinion or observation (&quot;the truth is&quot;, &quot;realistically&quot;, &quot;here&#039;s the thing&quot;)
    – One place, acknowledge a limitation or caveat honestly — this is what separates trusted content from promotional content

    — BANNED PHRASES —
    BANNED — never use any of these words or phrases:
    &quot;In conclusion&quot; / &quot;It&#039;s worth noting&quot; / &quot;Certainly&quot; / &quot;Moreover&quot; / &quot;Furthermore&quot; / &quot;It is important to note&quot; / &quot;In today&#039;s world&quot; / &quot;Look no further&quot; / &quot;Dive into&quot; / &quot;Delve into&quot; / &quot;Comprehensive&quot; / &quot;Navigating&quot; / &quot;Crucial&quot; / &quot;Leverage&quot; / &quot;Utilize&quot; / &quot;In summary&quot; / &quot;To summarize&quot; / &quot;Having said that&quot; / &quot;With that in mind&quot; / &quot;Needless to say&quot; / &quot;At the end of the day&quot; / &quot;Game changer&quot; / &quot;Cutting edge&quot; / &quot;Robust&quot; / &quot;Seamless&quot; / &quot;Streamline&quot; / &quot;Empower&quot; / &quot;Unlock&quot; / &quot;Fascinating&quot; / &quot;Invaluable&quot; / &quot;Transformative&quot; / &quot;Holistic&quot; / &quot;Groundbreaking&quot;
    Never open a section with a definition (&quot;X is a…&quot;). Lead with why it matters or what it does.


    Intro (120-150 words): Hook the reader with the real question behind their search. Don&#039;t restate the title as a question. Include the main keyword naturally in the first 100 words.

    Section — Background and context (180-220 words): What the reader needs to understand the topic properly. Accurate, specific, not padded.

    Section — The main substance (280-320 words): The real depth. Named examples, specific facts, accurate details. This is where most articles fail by staying shallow — don&#039;t.

    Section — Practical angle (180-220 words): How does this topic connect to real decisions, situations, or actions the reader might take?

    Section — What to know going forward (120-150 words): Key takeaways framed as useful knowledge, not a summary list.

    Closing (80-100 words): Genuine, human wrap-up. One useful next step for the reader.

    — OUTPUT FORMAT —
    OUTPUT FORMAT:
    – Full Canvas Preview OutPut
    – Use Normal headings. you can use normal bold but no h1 to h6 headings

    – NO inline CSS, class=, id=, style= on any tag
    – NO div, span, or br tags anywhere
    – Tables: &lt;table&gt;&lt;tr&gt;&lt;th&gt; / &lt;td&gt; only — no attributes on any tag

    – Then the full article body
    – Minimum 1200 words totalIMPORTANT OUTPUT RULES:
    Show full article in canvas at once, start writing article directly

  • svn window does not open on screen

    A problem like a missing application window can feel strangely misleading. The software launches, the process appears in Task Manager, and yet nothing shows up where you expect it. When users search for svn window does not open on screen, they are usually dealing with more than a simple display issue. The cause may involve multi-monitor settings, saved window positions, Windows display scaling, damaged configuration files, graphics driver behavior, or even integration problems with tools that rely on Subversion. The frustrating part is that the application often continues running normally in the background, making it seem frozen even though it is simply opening outside the visible desktop. Understanding why this happens—and knowing the safest way to recover the hidden window—can save time while preventing unnecessary software reinstallation or loss of project settings.

    Background and context

    Most people encounter this issue while working with Subversion (SVN) clients such as TortoiseSVN, SmartSVN, RapidSVN, or other graphical tools used to manage version-controlled projects. Although the search phrase suggests that SVN itself is the problem, the real cause often comes from Windows rather than the version control software.

    Graphical applications remember the last position and size of their windows. That behavior makes everyday work faster because programs reopen exactly where they were closed. But when a monitor is disconnected, display resolution changes, remote desktop sessions end, or display scaling is modified, the saved window coordinates may no longer match the current desktop. Instead of appearing on the visible screen, the application opens in an area that technically exists according to its saved settings but is no longer accessible.

    And this problem becomes even more common in workplaces where developers frequently connect laptops to docking stations or external monitors. A developer might close the SVN client on a second display at the office and later reopen the laptop at home using only its built-in screen. Windows may faithfully restore the previous position—even though that location is now invisible.

    Another factor (which many users overlook) is that some SVN clients store interface preferences in configuration files or the Windows Registry. If those settings become corrupted, window placement problems may persist until the stored values are reset.

    The main substance

    Finding the hidden window usually requires a systematic approach instead of immediately reinstalling the software.

    Start with the simplest solution. Select the SVN application from the Windows taskbar so it becomes active. Press Alt + Space, then press M to activate the Move command. Without clicking the mouse, use any arrow key once, then move the mouse slowly. If the window is off-screen, it often follows the mouse pointer back onto the visible display. Press the left mouse button to place it.

    But newer versions of Windows also provide another shortcut. Hold Shift while right-clicking the application’s taskbar icon and choose Move if that option appears. Depending on the application and Windows version, this may produce the same result.

    If multiple monitors were previously connected, pressing Windows + Shift + Left Arrow or Windows + Shift + Right Arrow can move the active window between displays. This shortcut works surprisingly well when the application still believes an external monitor exists.

    Display scaling deserves attention too. Suppose Windows was previously running at 125% or 150% scaling and later returned to 100%. Some older SVN clients calculate window positions differently after scaling changes. Opening Display Settings and temporarily restoring the previous resolution or scaling sometimes makes the hidden window visible again.

    And don’t overlook Task Manager. Right-click the running application inside Task Manager and select Maximize or Switch To if available. While these options are not present for every program, they occasionally force Windows to redraw the interface on the active desktop.

    Configuration corruption requires a different solution. TortoiseSVN stores many user preferences separately from repository data. Resetting only the interface settings may restore normal behavior without affecting your repositories. SmartSVN similarly stores workspace preferences that can be rebuilt after deleting or renaming the configuration folder. The exact folder depends on the application version and operating system, so checking the product documentation before deleting anything is the safest approach.

    Graphics drivers can also contribute. Outdated Intel, AMD, or NVIDIA drivers occasionally cause invisible or partially rendered windows after display changes. Updating the graphics driver—or temporarily disabling hardware acceleration when supported—can resolve unusual rendering behavior.

    Here’s the thing: reinstalling the SVN client rarely fixes this particular issue. Most installers intentionally preserve user settings during removal and installation, meaning the hidden window coordinates remain stored. Users often reinstall several times only to discover the invisible window appears exactly as before because the configuration was never reset.

    One limitation deserves mention. If the problem occurs only with one specific repository or project, the cause may not be the application window itself. Instead, damaged workspace metadata, plugin conflicts, or project-specific configuration files could be preventing the interface from loading correctly. Diagnosing that situation requires examining logs rather than focusing only on window placement.

    Practical angle

    The best response depends on when the issue started.

    If the problem appeared immediately after disconnecting an external monitor, concentrate on display-related fixes before changing software settings. Hidden windows account for many cases reported by developers using laptops in changing work environments.

    So when the issue follows a Windows update or graphics driver installation, test different display resolutions, restart Windows Explorer, and verify the graphics driver version before modifying application files. Sometimes Windows itself simply needs to rebuild the desktop layout after a major update.

    When the problem affects only one SVN application while every other program opens normally, resetting that client’s interface configuration becomes the logical next step. Before deleting any configuration folder, create a backup copy. Although repository history remains safely stored in the repository itself, personal preferences, bookmarks, and workspace layouts may be lost.

    Realistically, keeping software updated reduces the chances of recurring display problems. Newer versions of SVN clients generally handle high-DPI monitors, multiple displays, and Windows 11 display management much better than releases designed for older operating systems.

    And organizations that rely on Subversion should document recovery steps internally. A simple troubleshooting guide can save developers from losing productive hours each time someone changes monitors or works remotely from a different setup.

    What to know going forward

    Display technology continues changing faster than many desktop applications. High-resolution monitors, mixed-DPI environments, remote desktop sessions, and virtual desktops all introduce situations where saved window positions can become invalid.

    That means the phrase svn window does not open on screen often describes a Windows display state rather than an SVN malfunction. Recognizing that distinction leads to faster troubleshooting and avoids unnecessary reinstalls.

    Future updates to both Windows and SVN clients continue improving display compatibility, but older applications may still remember invalid coordinates after hardware changes. Keeping graphics drivers current, updating the SVN client regularly, and avoiding abrupt monitor configuration changes reduces the likelihood of the issue returning.

    And if the problem appears repeatedly after every restart, investigate saved configuration files instead of treating each occurrence as an isolated incident.

    Closing

    An invisible SVN window is frustrating because the software often appears to be working while remaining completely inaccessible. Fortunately, the underlying causes are usually predictable, ranging from off-screen window placement to configuration settings preserved across monitor changes. Working through display shortcuts, checking Windows settings, and resetting application preferences when necessary resolves most cases without affecting repositories or version history. The next time the window disappears, begin with Windows display recovery methods before reinstalling anything—you’ll often restore the interface in just a few minutes while keeping all of your existing project settings intact.

  • Memorandum of association and articles of association

    Every successful company begins with an idea, but ideas alone cannot create a legally recognized business. Before investors contribute money, before directors make decisions, and before customers trust a company, there must be a clear legal framework explaining what the company can do and how it will operate. That framework is created through the memorandum of association and articles of association. These two documents form the constitutional foundation of a company and influence almost every aspect of its functioning. By the end of this article, you will understand their meaning, differences, legal significance, practical applications, and the mistakes students often make when answering examination questions or studying company law.

    Core Concept and Definition

    Think of a company as a separate legal person created under company law. Like any organized institution, it needs rules that define both its identity and its internal governance. The memorandum of association and articles of association work together to achieve this goal—but they serve very different purposes.

    The Memorandum of Association (MOA) is the primary constitutional document of a company. It defines the company’s relationship with the outside world by specifying its legal identity, objectives, and powers. It also sets limits on what the company is legally allowed to undertake. If a company performs activities beyond the powers stated in its memorandum (known as the doctrine of ultra vires), those actions may be considered invalid.

    The Articles of Association (AOA) provide the internal rulebook for managing the company. They regulate relationships among shareholders, directors, officers, and the company itself. The articles explain how meetings are conducted, how directors are appointed, how shares may be transferred, voting procedures, dividend distribution, and many other operational matters.

    And although these documents are closely connected, they are not interchangeable. The memorandum establishes the company’s scope and existence, while the articles explain how that company functions from day to day.

    Realistically, students remember this distinction more easily when they think of the memorandum as the company’s “constitution” and the articles as its “operating manual.”

    Deep Explanation with Worked Examples

    Understanding these documents becomes much easier when each clause of the memorandum is studied individually.

    The memorandum generally contains several important clauses.

    Name Clause

    This specifies the official legal name under which the company is registered. The name must follow legal requirements and usually ends with “Limited” or “Private Limited,” depending on the type of company.

    Example:

    ABC Technologies Private Limited cannot legally operate under another business name unless the law permits and proper procedures are followed.

    Registered Office Clause

    This clause states the state or jurisdiction in which the company’s registered office is situated. Government authorities, courts, and regulatory agencies use this address for official communication.

    Object Clause

    The object clause explains the purpose for which the company has been formed. It identifies the main business activities that the company intends to carry out.

    Example:

    Suppose XYZ Manufacturing Ltd. is incorporated to manufacture electrical appliances.

    Permitted activity:

    • Manufacturing refrigerators
    • Producing washing machines
    • Selling electrical equipment

    Not permitted (unless properly amended):

    • Running an airline
    • Operating a hospital

    So, if the company suddenly starts an unrelated airline business without modifying its memorandum, the action could violate the doctrine of ultra vires.

    Liability Clause

    This clause specifies whether the liability of shareholders is limited by shares, limited by guarantee, or unlimited.

    Worked Example:

    A shareholder owns 500 shares valued at ₹10 each.

    Total share value = Number of Shares × Face Value

    Total share value = 500 × ₹10 = ₹5,000

    If the shareholder has already paid the entire ₹5,000, no further liability normally arises (subject to applicable law).

    If only ₹7 per share has been paid:

    Outstanding amount = ₹3 × 500

    Outstanding amount = ₹1,500

    The shareholder’s liability generally remains limited to this unpaid amount.

    Capital Clause

    This clause states the authorized share capital of the company.

    Formula:

    Authorized Share Capital = Number of Authorized Shares × Face Value per Share

    Example:

    Authorized Shares = 2,00,000

    Face Value = ₹10

    Authorized Capital = 2,00,000 × ₹10 = ₹20,00,000

    This figure represents the maximum share capital the company may issue unless the capital is increased according to legal procedures.

    Now consider the Articles of Association.

    Instead of defining the company’s legal boundaries, these articles govern internal administration.

    Typical provisions include:

    • Appointment, removal, and powers of directors
    • Share transfer procedures (which can be more restrictive in private companies)
    • Conduct of annual general meetings and extraordinary meetings
    • Voting rights of members
    • Issue of additional shares
    • Dividend declaration
    • Borrowing powers
    • Maintenance of company records

    Imagine two shareholders disagree about voting rights during a meeting. The answer will usually be found in the Articles of Association rather than the Memorandum.

    But here’s the thing—the articles cannot override the memorandum. If the articles contain a rule that conflicts with the memorandum, the memorandum prevails because it has higher constitutional authority.

    And this hierarchy (which many students overlook) frequently appears in university examinations.

    Difference Between Memorandum of Association and Articles of Association

    Real-World Applications

    These documents are far more than examination topics. They play a central role throughout a company’s life.

    During company incorporation, government authorities examine both documents before granting registration. Investors often review the memorandum to understand whether the company’s objectives match their investment goals. Banks may examine these constitutional documents before approving loans because they indicate borrowing powers and governance arrangements.

    Corporate lawyers regularly refer to both documents while drafting contracts, resolving shareholder disputes, advising directors, or restructuring companies. Auditors also consult them to verify whether management decisions comply with legal requirements.

    So the memorandum and articles influence decisions long after incorporation. Even startup founders who have never studied company law encounter these documents while registering their businesses.

    Competitive examinations such as CA Foundation, CS Executive, CMA, B.Com, MBA entrance tests, university law papers, and public service examinations frequently include direct questions comparing the memorandum with the articles. Many objective questions also test knowledge of clauses such as the object clause or liability clause.

    There is one honest limitation, though. The exact legal procedures for drafting or altering these documents differ across jurisdictions because company laws vary from country to country. While the underlying concepts remain consistent, students should always refer to the company legislation applicable in their own country.

    Common Mistakes and Misconceptions

    One of the biggest misconceptions is believing that both documents perform the same function. They do not. The memorandum establishes the company’s legal identity and powers, while the articles regulate internal administration.

    Another common mistake is assuming that the Articles of Association are more powerful because they contain detailed operational rules. The opposite is true—the memorandum has superior legal authority.

    Students also confuse the object clause with business strategy. The object clause specifies legally permitted activities, whereas business strategy explains how the company plans to compete in the marketplace.

    Many examination answers incorrectly state that shareholders have unlimited liability. This is inaccurate for companies limited by shares. Liability is generally restricted to the unpaid amount on shares.

    Or students sometimes write that any activity approved by directors automatically becomes legal. Director approval cannot authorize actions beyond the powers granted in the memorandum.

    A surprisingly frequent error appears in comparison tables. Learners reverse the roles of the memorandum and articles by writing that the memorandum governs meetings and voting procedures. Those matters belong in the Articles of Association.

    And finally, some candidates memorize definitions without understanding the relationship between the two documents. Examiners increasingly reward explanation and application rather than simple recall.

    Closing

    Understanding the memorandum of association and articles of association gives you much more than an examination answer—it explains how companies exist, operate, and remain accountable under the law. Once you can distinguish external powers from internal management, many other topics in company law become easier to understand. Your next step should be to study the individual clauses of the memorandum alongside sample Articles of Association from an actual company. Reading real documents while solving past examination questions will strengthen both your legal understanding and your ability to apply these concepts accurately.

  • Will there be a 16tb m 2 drive

    Will there be a 16tb m 2 drive

    Will There Be a 16TB M.2 Drive? What to Expect from the Future of High-Capacity SSDs

    Storage capacity has a habit of catching people by surprise. Not long ago, a 1TB solid-state drive seemed excessive for most computers. Today, creators working with 8K video, AI datasets, massive game libraries, and enterprise workloads can fill several terabytes faster than they ever expected. That shift explains why so many people are searching for will there be a 16TB M.2 drive rather than simply asking about today’s SSDs. The real issue is not whether the technology exists in theory, but when it becomes practical, affordable, and widely available. The answer involves advances in NAND flash density, controller technology, manufacturing costs, and thermal design. Understanding those pieces helps explain where the market stands today and what buyers should realistically expect over the next few years.

    Background and Context

    Storage technology has evolved much faster than traditional hard drives. Early consumer M.2 SSDs commonly offered capacities between 128GB and 512GB. As manufacturers improved flash memory density, 1TB and 2TB models became mainstream. Soon after, 4TB drives entered the consumer market, followed by premium 8TB models aimed at professionals and enthusiasts.

    The M.2 form factor presents unique engineering challenges. Unlike larger 2.5-inch SSDs, an M.2 2280 drive has very limited physical space for NAND chips, the controller, cache memory, and power circuitry. Every new jump in storage capacity requires manufacturers to fit more data into the same compact board without increasing heat generation or reducing reliability.

    And that is where advances in 3D NAND technology become especially important. Instead of spreading memory cells across a larger surface, manufacturers stack hundreds of layers vertically, dramatically increasing storage density. Companies such as Samsung, Micron, Western Digital, Kioxia, and SK hynix continue increasing layer counts while refining manufacturing techniques (which often takes years before reaching mainstream products).

    Another factor is market demand. Enterprise customers often adopt extremely high-capacity SSDs before consumers do because data centers benefit immediately from reducing physical server space. Consumer products usually follow once manufacturing costs decrease enough to make retail pricing attractive.

    Will There Be a 16TB M.2 Drive?

    The short answer is yes. In fact, 16TB M.2 SSDs already exist in limited enterprise and industrial markets, although they remain rare and expensive for everyday consumers.

    That distinction matters because “available” does not always mean “practical.” Enterprise drives are designed for continuous workloads, specialized servers, and commercial systems where reliability outweighs purchase price. Many use custom firmware, higher endurance ratings, and extensive validation processes that naturally increase costs.

    Consumer availability depends on several technological improvements happening simultaneously.

    The first is NAND density. Every generation of 3D NAND stores more bits within each memory package. Manufacturers now produce flash memory with well over 200 stacked layers, and research continues toward even denser designs. Higher-density packages allow engineers to fit substantially more storage onto the same M.2 PCB.

    But storage chips alone are not enough. SSD controllers must efficiently manage enormous address spaces while maintaining consistent read and write performance. As capacities increase, firmware becomes more sophisticated because wear leveling, error correction, garbage collection, and caching all scale with drive size.

    Heat is another challenge. Large-capacity PCIe Gen4 and Gen5 SSDs already require heatsinks in many desktop systems. A future consumer 16TB M.2 drive will likely generate considerable heat during sustained workloads, especially when transferring multiple terabytes continuously. Manufacturers are investing heavily in more efficient controllers to reduce power consumption without sacrificing speed.

    Here’s the thing: pricing remains the biggest obstacle rather than engineering. Technically, manufacturers know how to build these drives. Producing millions of them at prices consumers will actually pay is an entirely different challenge.

    Recent flagship consumer SSDs have steadily increased from 2TB to 4TB and now 8TB capacities, suggesting that 16TB consumer models are the logical next step as NAND production becomes cheaper.

    What Makes a 16TB M.2 SSD Difficult to Build?

    Several technical factors explain why these drives have taken longer than many expected.

    One limitation involves the physical dimensions of the standard M.2 2280 format. Engineers cannot simply enlarge the board because motherboards are designed around standardized sizes. Every memory package must fit within strict space constraints.

    Power efficiency also becomes increasingly significant. A larger drive contains more flash packages, each requiring careful management. Even slight increases in power consumption multiply across the entire device, affecting thermals inside laptops and compact desktops.

    And reliability expectations grow with capacity. Losing data on a 500GB drive is frustrating. Losing 16TB of creative work, business records, or research data could be catastrophic. Manufacturers therefore perform extensive endurance testing before releasing ultra-high-capacity products.

    There is also the economics of semiconductor manufacturing. Flash memory production competes with demand from smartphones, enterprise servers, AI infrastructure, cloud providers, and consumer electronics. Production priorities influence pricing just as much as engineering breakthroughs.

    One commonly overlooked factor is motherboard compatibility. Older systems may support physically installing a high-capacity SSD while lacking BIOS support or firmware optimizations for the newest storage technologies. Buyers considering future upgrades should verify motherboard specifications, available PCIe lanes, firmware updates, and operating system compatibility before purchasing extremely large drives.

    Who Will Benefit Most from a 16TB M.2 Drive?

    Not every computer user needs this much storage.

    Video production studios increasingly work with RAW 8K footage where individual projects consume several terabytes. Keeping active projects on one ultra-fast SSD dramatically improves editing efficiency.

    Game developers face similar challenges. Large development environments, compiled assets, multiple engine versions, and testing builds can occupy enormous amounts of storage over time.

    Artificial intelligence researchers often store extensive training datasets locally. High-capacity NVMe drives reduce dependence on slower external storage during machine learning workflows.

    Professional photographers managing years of high-resolution RAW files also benefit from combining speed and capacity in a single drive.

    But most home users will not immediately gain much from upgrading to 16TB. A combination of a fast 2TB or 4TB SSD paired with additional secondary storage often delivers better overall value. Realistically, buying more capacity than you can reasonably use rarely improves day-to-day computing.

    Should You Wait for a Consumer 16TB M.2 SSD?

    That depends on your workload rather than the technology roadmap.

    If your current storage regularly reaches 90% utilization despite careful file management, waiting could make sense—especially if your upgrade timeline extends over the next couple of years. Prices generally decline as production scales.

    On the other hand, delaying an upgrade simply because larger drives are coming rarely pays off. Storage technology improves continuously. Waiting for the next milestone often means waiting forever because another generation is always approaching.

    Users needing additional space today may find greater value by purchasing a reliable 4TB or 8TB NVMe SSD, then expanding again when 16TB models become mainstream and more affordable.

    A small caveat deserves mentioning: no storage device should be treated as a permanent archive, regardless of capacity. Even the most reliable SSD requires regular backups, since hardware failures, accidental deletion, and file corruption remain possible.

    What to Know Going Forward

    The trend is unmistakable. SSD capacities continue rising as NAND flash becomes denser and manufacturing processes mature. Consumer 16TB M.2 drives are not science fiction; they represent the next logical stage in storage development.

    So expect enterprise adoption to remain ahead of consumer availability for a while. That pattern has repeated throughout SSD history, with professional hardware arriving first before prices gradually fall into the mainstream market.

    The truth is that cost—not technical feasibility—is likely to determine when most buyers consider a 16TB M.2 SSD a sensible purchase. As production volumes increase and competition grows among major manufacturers, those drives will become progressively easier to find at retail.

    Closing

    The question “will there be a 16TB M.2 drive” already has an encouraging answer. The technology exists, manufacturers continue pushing storage density higher, and consumer versions are becoming increasingly realistic as production costs decline. For professionals handling enormous datasets, the future looks especially promising. Everyone else can take a practical approach: buy the storage you genuinely need today, keep reliable backups, and watch the market as larger-capacity SSDs move from premium products to everyday hardware. History suggests that what seems extraordinary now often becomes the new standard surprisingly quickly.

  • Schand icse mathematics class 9 solution

    The Fantastic Four: First Steps Sequel Fancast

    Superhero franchises rarely face a bigger challenge than casting the next chapter correctly. A great sequel is not built only on visual effects or larger action scenes. It often depends on whether new characters feel like natural additions to the world audiences have already invested in. That is exactly why discussion around a the fantastic four first steps sequel fancast has become such a popular topic among Marvel fans.

    The excitement goes beyond simple celebrity wish lists. Fans are already looking ahead to which iconic Marvel characters could enter the story after the events of The Fantastic Four: First Steps. The Fantastic Four have one of the richest supporting casts in comic-book history, filled with cosmic threats, political rivals, family members, and powerful allies. A sequel provides the perfect opportunity to expand that universe.

    What makes fancasting especially interesting is that it reveals how audiences imagine the future of Marvel’s First Family. Some choices prioritize comic-book accuracy, while others focus on acting range, star power, or long-term franchise potential. The result is a conversation that says as much about the future of the Marvel Cinematic Universe as it does about individual actors.

    Background and Context

    Marvel’s Fantastic Four occupy a unique place in comic-book history. Introduced by Stan Lee and Jack Kirby in 1961, the team helped launch the modern Marvel era. Unlike many superheroes, they were presented as a family first and heroes second.

    That distinction matters because their stories often revolve around relationships rather than crime-fighting alone. Reed Richards balances scientific obsession with family responsibilities. Sue Storm serves as the emotional center of the group. Johnny Storm brings youthful energy and recklessness, while Ben Grimm provides humor, loyalty, and humanity.

    The upcoming Marvel adaptation carries enormous expectations because previous Fantastic Four films delivered mixed results at the box office and with critics. Fans hope The Fantastic Four: First Steps finally establishes the team as a cornerstone of the MCU.

    A sequel would almost certainly need to widen the scope. The Fantastic Four’s comic mythology stretches across galaxies, alternate dimensions, hidden civilizations, and some of Marvel’s most influential villains. And that creates fertile ground for fancasting discussions.

    Unlike standalone superhero films, Fantastic Four stories naturally invite new major characters with each installment. The team’s adventures often introduce figures who later become essential to broader Marvel storylines — making sequel casting speculation more than simple entertainment.

    The Main Substance: The Best Fantastic Four First Steps Sequel Fancast Choices

    One of the most frequently discussed possibilities is the arrival of Franklin Richards. In Marvel Comics, Franklin is the son of Reed and Sue and eventually becomes one of the most powerful beings in existence. Casting a child actor for such a role requires unusual care because the character could become central to future MCU projects.

    Another major candidate for a sequel debut is Silver Surfer. While some versions of the character may appear earlier, many fans expect the cosmic herald to remain important throughout future Fantastic Four stories. The role demands an actor capable of balancing emotional depth with an almost alien sense of detachment.

    For the voice and performance of Silver Surfer, names such as Cillian Murphy, Dan Stevens, and Richard Madden often appear in fan discussions. Each offers a different interpretation of the character’s tragic personality.

    Doctor Doom remains the most important piece of the puzzle.

    The ruler of Latveria is not merely a villain. He is a scientific genius, political leader, sorcerer, and one of Marvel’s most layered antagonists. A sequel could either expand his role or establish him as the saga’s primary threat.

    Several actors frequently emerge in Doom fancasts. Mads Mikkelsen brings gravitas and intelligence. Nikolaj Coster-Waldau offers charisma mixed with authority. Michael Fassbender possesses the intensity necessary for a character driven by pride and obsession.

    But Doctor Doom is not the only villain available.

    A sequel could introduce Annihilus, ruler of the Negative Zone (one of the most dangerous dimensions in Marvel lore). The character would likely require motion-capture performance work similar to what Marvel has done with other large-scale antagonists. Actors known for expressive physical acting could thrive in such a role.

    Then there is Namor.

    The relationship between Namor and Sue Storm has fueled comic-book stories for decades. Since Namor already exists in the MCU, a sequel could explore those tensions further. That dynamic creates conflict without relying entirely on traditional villainy, making the narrative more complex and interesting.

    Here’s the thing: the strongest fancasts are not always the biggest stars. Marvel’s most successful casting decisions have often involved performers who embodied the character rather than simply generating headlines.

    Practical Angle: Why Sequel Fancasts Matter to Fans

    At first glance, fancasting can seem like little more than internet entertainment. Yet it plays a larger role in modern franchise culture.

    Fans use fancasts to evaluate whether a franchise is moving in a direction they find exciting. Casting choices influence tone, storytelling possibilities, and even audience expectations years before a movie enters production.

    Consider how certain actors bring specific strengths to a role. A performer known for dramatic work may suggest a darker interpretation of Doctor Doom. Another actor associated with action-heavy projects might point toward a more physical version of the character.

    And studios pay attention to audience reactions.

    While fan campaigns rarely determine final casting decisions, widespread enthusiasm can influence public conversation around a project. Social media has amplified that effect dramatically over the last decade.

    There is also an educational aspect. Many younger viewers discover comic-book history through fancasting discussions. Researching potential characters often leads fans back to decades of Marvel stories they might never have explored otherwise.

    A caveat deserves mention, though. Casting rumors frequently circulate online without reliable sources. Not every viral fancast reflects actual studio plans, and many popular suggestions never progress beyond fan speculation.

    Realistically, the best approach is to enjoy fancasts as creative exercises rather than predictions.

    What to Know Going Forward

    The future of the Fantastic Four franchise will likely extend far beyond a single sequel. Marvel has invested heavily in the team because they occupy a central position within the publisher’s broader mythology.

    That means sequel casting decisions could have ripple effects across multiple MCU projects. Characters introduced in a Fantastic Four sequel might later appear in crossover films, streaming series, or major event storylines.

    So when fans discuss actors for Doctor Doom, Silver Surfer, Franklin Richards, or Annihilus, they are often imagining several years of storytelling rather than one movie.

    The truth is that Marvel’s casting history has repeatedly shown how unexpected choices can become iconic performances. Many actors initially questioned by audiences eventually defined their characters for an entire generation.

    That uncertainty is part of what makes sequel fancasting so engaging.

    Closing

    Speculation about a the fantastic four first steps sequel fancast reflects the enormous anticipation surrounding Marvel’s First Family. Fans are not simply guessing names; they are imagining the future shape of one of the MCU’s most important franchises.

    Whether the sequel introduces Doctor Doom, expands cosmic storylines through Silver Surfer, or explores the next generation with Franklin Richards, casting will play a major role in determining its success.

    The next step for interested fans is simple: revisit classic Fantastic Four comic runs. Many of the most popular fancast ideas make far more sense once you understand the characters, relationships, and storylines that inspired them in the first place.

  • Most uptodate java for stack builder and postgresql instal

    Most uptodate java for stack builder and postgresql instal

    Software installation guides often focus on databases, extensions, or configuration screens. Yet one of the most common causes of PostgreSQL installation problems happens before the database server even starts: Java compatibility. That is why searches for the most uptodate java for stack builder and postgresql install continue to appear across forums, developer communities, and enterprise support channels.

    The real issue is not simply finding the latest Java release. PostgreSQL itself does not require Java to run, but some tools, extensions, migration utilities, reporting platforms, and third-party applications connected through Stack Builder may depend on a compatible Java Runtime Environment (JRE) or Java Development Kit (JDK). Choosing the wrong version can lead to installation failures, launch errors, or unexpected compatibility issues later.

    Understanding where Java fits into the PostgreSQL ecosystem helps avoid wasted troubleshooting time and ensures a cleaner deployment from the beginning.

    Background and Context

    Most PostgreSQL installations today come from the PostgreSQL Global Development Group (PGDG) installers available for Windows, Linux, and macOS. During installation on Windows, users often encounter Stack Builder, a companion utility that allows additional packages to be installed after PostgreSQL itself is running.

    Stack Builder serves as a package manager for PostgreSQL-related software. It can install drivers, replication tools, spatial extensions, migration utilities, and development components. Some of these tools have Java dependencies while PostgreSQL’s core database engine does not.

    That distinction matters — many users mistakenly assume PostgreSQL requires Java because another application in their stack requests it during setup.

    Recent Java releases follow a six-month release cycle. Oracle, Eclipse Adoptium, Amazon Corretto, and other vendors regularly publish new builds. While Java 24 and Java 25 development releases may exist depending on the timing of installation, production environments generally favor Long-Term Support (LTS) versions because software vendors certify against them more frequently.

    For most PostgreSQL-related software in 2025 and 2026, Java 21 LTS has emerged as the preferred modern choice. It offers long support timelines, broad ecosystem adoption, and compatibility with current enterprise software. Some older PostgreSQL tools still support Java 17 LTS, making it a practical fallback when working with legacy applications.

    And that difference between “latest” and “best supported” is where many installations succeed or fail.

    The Main Substance

    When evaluating the most uptodate java for stack builder and postgresql install, the answer depends on what is actually being installed alongside PostgreSQL.

    A standard PostgreSQL server installation requires no Java whatsoever. Database services, SQL execution, replication, backups, indexing, and query processing all operate independently of the Java platform.

    Things change when additional software enters the picture.

    Consider pgAdmin. Current versions do not require a locally installed Java runtime. The application is built around web technologies and Python components. Installing Java solely for pgAdmin offers no benefit.

    Now consider database migration tools. Applications such as DBeaver, Liquibase, Flyway Community Edition, Pentaho Data Integration, and numerous enterprise ETL platforms rely heavily on Java. In these situations, selecting an appropriate JDK becomes necessary.

    Java 21 LTS currently provides the strongest balance of:

    • Long-term vendor support
    • Broad compatibility across development tools
    • Strong security updates
    • Active ecosystem adoption
    • Modern JVM performance improvements

    Many organizations standardizing PostgreSQL deployments have shifted from Java 17 LTS to Java 21 LTS because software vendors increasingly certify against newer LTS releases.

    But compatibility remains more important than version numbers.

    A migration utility certified for Java 17 may not yet support Java 24. Installing the newest available Java release simply because it exists can introduce avoidable problems. Realistically, production administrators usually prioritize supported versions over bleeding-edge releases.

    Another factor involves JDBC drivers.

    JDBC serves as the bridge between Java applications and PostgreSQL databases. PostgreSQL JDBC drivers are generally backward compatible across multiple Java versions, but newer driver releases often deliver performance improvements, security fixes, and protocol enhancements. Using an up-to-date PostgreSQL JDBC driver alongside Java 21 typically produces the most predictable results.

    And containerized deployments add another layer. Organizations deploying PostgreSQL-related services through Docker or Kubernetes frequently bundle a specific JDK version inside application containers. In those environments, the host machine’s Java version becomes less important than the version packaged with the application image.

    There is also a caveat worth acknowledging honestly: some older Stack Builder packages receive updates less frequently than PostgreSQL itself. A package available through Stack Builder may not immediately support the newest Java release, even if the underlying software eventually will. Checking vendor documentation remains essential before upgrading Java in production systems.

    Practical Angle

    Suppose you are installing PostgreSQL on a Windows workstation for development.

    The simplest path usually looks like this:

    1. Install PostgreSQL using the official installer.
    2. Complete initial database configuration.
    3. Launch Stack Builder only if additional packages are required.
    4. Identify whether the selected package actually depends on Java.
    5. Install Java 21 LTS if a Java runtime or development kit is required.

    This approach prevents unnecessary software installation.

    For enterprise environments, administrators often maintain a standard software baseline. Instead of installing the newest Java release immediately, they deploy approved LTS versions across servers. That policy reduces maintenance complexity and simplifies patch management.

    Developers face slightly different considerations.

    A software engineer building Spring Boot applications against PostgreSQL may benefit from Java 21’s performance enhancements, virtual threads, and modern language features. Meanwhile, a legacy reporting application connected to PostgreSQL might remain locked to Java 17 until vendor certification catches up.

    So the correct answer depends on the surrounding ecosystem rather than PostgreSQL alone.

    Here’s the thing: many installation issues blamed on PostgreSQL actually originate from mismatched Java environments. Error messages referencing unsupported class versions, missing runtimes, or incompatible JVM builds almost always indicate a Java compatibility problem rather than a database problem.

    When troubleshooting, checking the Java version should be among the first diagnostic steps.

    What to Know Going Forward

    The PostgreSQL ecosystem continues evolving alongside the Java platform. New PostgreSQL releases focus on performance, security, replication, and developer productivity, while Java continues introducing JVM optimizations and language improvements.

    For current installations, Java 21 LTS represents the safest recommendation for most PostgreSQL-related tooling (especially migration platforms, ETL systems, and Java-based administrative utilities). It strikes a balance between modern features and proven stability.

    Organizations running older software may still require Java 17 LTS. That does not automatically indicate a problem; it simply reflects certification and support timelines.

    Or put another way, the newest Java version is not always the most appropriate version.

    Keeping PostgreSQL packages, JDBC drivers, and Java runtimes aligned with vendor recommendations will generally produce fewer deployment surprises and easier upgrades in the future.

    Closing

    Searching for the most uptodate java for stack builder and postgresql install often leads people toward the latest Java release number. The better question is which version delivers the strongest compatibility with the tools being installed alongside PostgreSQL.

    For most current deployments, Java 21 LTS is the recommended choice. It is widely supported, actively maintained, and suitable for the majority of PostgreSQL-related software. Before installing any Stack Builder package, verify its documented Java requirements, then match your runtime accordingly. A few minutes spent checking compatibility can prevent hours of troubleshooting later.

  • Common core geometry unit 2 transformations answers

    Common core geometry unit 2 transformations answers

    Geometry often feels like a subject about shapes, lines, and measurements. Yet one of the most powerful ideas in the entire course is movement. Instead of asking what a figure looks like, transformations ask what happens when that figure slides, flips, turns, or changes size. That shift in thinking is exactly why so many students spend extra time searching for common core geometry unit 2 transformations answers. The challenge is rarely the final answer itself. The real difficulty comes from understanding the rules behind each transformation and applying them correctly.

    By the end of this article, you will understand the major transformation concepts covered in Common Core Geometry Unit 2, learn how to solve typical problems step by step, recognize common mistakes before they happen, and see how these ideas connect to both exams and real-world applications.

    Why Transformations Matter in Geometry

    A transformation changes the position, orientation, or size of a figure according to a specific rule. In Common Core Geometry Unit 2, students typically study four major transformations:

    • Translations
    • Reflections
    • Rotations
    • Dilations

    Three of these preserve size and shape exactly. These are called rigid transformations. Dilations change size while maintaining proportional relationships, making them non-rigid transformations.

    The purpose of studying transformations goes far beyond moving points on a coordinate plane. Transformations provide the foundation for understanding congruence and similarity. When one figure can be transformed into another through rigid transformations, the figures are congruent. When a dilation is involved, the figures may be similar.

    And that idea becomes a major building block for later geometry topics.

    A translation slides a figure without rotating or flipping it. Every point moves the same distance in the same direction.

    A reflection creates a mirror image across a line called the line of reflection.

    A rotation turns a figure around a fixed point called the center of rotation.

    A dilation enlarges or reduces a figure using a scale factor measured from a center point.

    These definitions may seem straightforward, but students often struggle because they try to memorize procedures rather than understand what each movement actually does to coordinates and distances.

    Deep Explanation with Worked Examples

    The fastest way to understand transformations is to work through actual coordinate examples.

    Example 1: Translation

    Suppose point A is located at (2, 3).

    The transformation rule is:

    (x, y) → (x + 4, y − 2)

    Apply the rule:

    x-coordinate: 2 + 4 = 6

    y-coordinate: 3 − 2 = 1

    The image of point A is:

    A’ = (6, 1)

    Notice what happened. The point moved 4 units right and 2 units down. No rotation occurred. No change in shape occurred. Distances remain identical.

    So translations preserve both angle measures and side lengths.

    Example 2: Reflection Across the x-Axis

    Take point B = (5, 4).

    Reflection rule:

    (x, y) → (x, −y)

    Apply the rule:

    B’ = (5, −4)

    The x-coordinate stays unchanged because the point remains the same distance from the y-axis.

    The y-coordinate changes sign because the point moves to the opposite side of the x-axis.

    Students frequently remember this more easily by visualizing a mirror placed along the x-axis.

    Example 3: Reflection Across the y-Axis

    Point C = (−3, 7)

    Rule:

    (x, y) → (−x, y)

    Apply the rule:

    C’ = (3, 7)

    Only the x-coordinate changes sign.

    This pattern appears repeatedly on quizzes and standardized tests.

    Example 4: Rotation 90° Counterclockwise About the Origin

    Point D = (4, 1)

    Rule:

    (x, y) → (−y, x)

    Substitute values:

    D’ = (−1, 4)

    Students often confuse clockwise and counterclockwise rules. Here’s the thing: drawing a quick sketch usually prevents costly errors.

    For reference:

    90° Counterclockwise:
    (x, y) → (−y, x)

    90° Clockwise:
    (x, y) → (y, −x)

    180° Rotation:
    (x, y) → (−x, −y)

    Even advanced students occasionally mix these formulas up during timed exams.

    Example 5: Dilation

    Suppose point E = (2, 5).

    Scale factor = 3

    Center of dilation = origin

    Rule:

    (x, y) → (3x, 3y)

    Substitute:

    E’ = (6, 15)

    Every coordinate is multiplied by the scale factor.

    When the scale factor is greater than 1, the figure enlarges.

    When the scale factor is between 0 and 1, the figure shrinks.

    A scale factor of 1 leaves the figure unchanged.

    And unlike rigid transformations, dilations alter side lengths while preserving shape.

    Combining Transformations

    Many Unit 2 problems involve multiple transformations.

    Imagine a triangle undergoes:

    1. Translation 3 units right
    2. Reflection across the x-axis

    Starting point:

    P = (1, 2)

    Step 1:

    (1 + 3, 2)

    P₁ = (4, 2)

    Step 2:

    (4, −2)

    Final image:

    P’ = (4, −2)

    Order matters.

    If you reflect first and then translate, the final coordinates may be different. This concept (often overlooked during homework assignments) becomes increasingly important in higher-level mathematics.

    Real-World Applications of Transformations

    At first glance, transformations can seem like exercises designed only for geometry class. The reality is much different.

    Computer graphics rely heavily on transformations. Every time a character moves across a video game screen, translations are being used. When objects spin, rotations control the movement. Scaling effects depend on dilations.

    Architecture also uses transformation principles. Building designs often include symmetrical elements created through reflections and rotations. Engineers use transformation concepts to maintain consistency across complex structures.

    Medical imaging provides another example. Doctors examining MRI and CT scans frequently work with images that have been rotated, reflected, or scaled to improve analysis and comparison.

    And transformations appear constantly on standardized exams. Questions involving congruence, similarity, symmetry, coordinate geometry, and proofs often depend on understanding transformation rules.

    The truth is that students who genuinely understand transformations usually perform better across multiple geometry units because these ideas connect to many later topics.

    There is one caveat, though. Real-world software performs these operations using matrix mathematics and more advanced techniques than those covered in Unit 2. Geometry class focuses on the conceptual foundation rather than the full computational methods.

    Common Mistakes and Misconceptions

    Many incorrect answers come from a small set of predictable mistakes.

    One frequent error occurs during reflections.

    Students may change both coordinates when reflecting across a single axis.

    For example:

    (3, 5)

    Reflected across the x-axis should become:

    (3, −5)

    Only the y-coordinate changes.

    Another common mistake appears in rotations.

    Students memorize coordinate rules but apply the wrong one under pressure. A quick sketch of the coordinate plane often reveals whether the answer makes sense before submitting it.

    Dilations create a different problem.

    Some students assume side lengths remain unchanged because translations, reflections, and rotations preserve size. But dilations intentionally change size. A scale factor of 2 doubles all distances from the center of dilation.

    Negative coordinates also create confusion.

    For instance, when applying:

    (x, y) → (−x, y)

    to point (−4, 6),

    the image becomes:

    (4, 6)

    The negative sign changes the coordinate’s sign; it does not simply get added.

    But perhaps the biggest misconception involves congruence and similarity.

    Rigid transformations prove congruence because they preserve size and shape.

    Dilations produce similarity because shape remains proportional while size changes.

    Recognizing this distinction helps students answer many geometry proof questions correctly.

    What to Practice Next

    Mastering transformations requires repetition, but productive repetition matters more than completing dozens of nearly identical problems. Focus on identifying the transformation first, then apply the correct coordinate rule, and finally check whether distances and orientations make sense. Practice translating figures, reflecting them across different axes, rotating them about the origin, and performing dilations with various scale factors. After that, move on to sequences of transformations involving two or more steps. Once those skills feel comfortable, topics like congruence, similarity, and geometric proofs become much easier to understand and solve accurately.

  • most uptodate java for stack builder and postgresql install

    most uptodate java for stack builder and postgresql install

    Software installation guides often focus on the database itself while quietly ignoring one of the most common causes of installation failures: Java compatibility. That oversight becomes surprisingly important when working with PostgreSQL tools, especially older releases of Stack Builder. A database server may install perfectly, yet add-on components can fail because the wrong Java version is present or because Java is not installed at all.

    When people search for the most uptodate java for stack builder and postgresql install, they are usually trying to answer a larger question. Which Java version will work reliably with PostgreSQL tools today without creating compatibility issues tomorrow? The answer is not always straightforward because PostgreSQL itself does not require Java for its core database engine, while several companion tools and extensions may depend on it. Understanding where Java fits into the PostgreSQL ecosystem can save hours of troubleshooting and help create a cleaner installation environment from the beginning.

    Background and context

    The PostgreSQL database server is written primarily in C and does not require Java to run. A fresh PostgreSQL installation on Windows, Linux, or macOS can operate normally without any Java Runtime Environment (JRE) or Java Development Kit (JDK) installed.

    Confusion often begins with Stack Builder. Included with many PostgreSQL Windows installations, Stack Builder serves as a package manager that helps users download additional tools, drivers, extensions, and supporting software. Some of these packages have Java-related requirements, while others do not.

    Historically, many PostgreSQL-related utilities were built around older Java versions such as Java 8. During that period, organizations commonly standardized on Oracle Java 8 because it offered long-term stability and broad compatibility. Over time, however, the Java ecosystem shifted toward more frequent release cycles and new long-term support (LTS) versions.

    Today, most enterprise software vendors target modern LTS releases rather than legacy Java distributions. And that changes the recommendation for anyone setting up PostgreSQL in 2026.

    Another factor is that PostgreSQL itself evolves independently from Java. PostgreSQL 14, 15, 16, and newer releases continue advancing database performance, query optimization, replication capabilities, and security features regardless of the Java version installed on the system.

    The result is a layered environment where the database, Stack Builder packages, JDBC drivers, reporting tools, and application servers may each have slightly different Java requirements (which is why checking individual package documentation remains worthwhile).

    The main substance

    For a modern PostgreSQL installation in 2026, the most practical Java choice is Java 21 LTS.

    Java 21 became one of the most widely adopted long-term support releases because it balances modern features with extended vendor support. Organizations deploying enterprise applications increasingly use Java 21 for backend systems, database connectivity, and application servers.

    When PostgreSQL users install Java for Stack Builder-related tools, several considerations matter.

    First, JDBC connectivity benefits from current Java releases. PostgreSQL’s JDBC driver is actively maintained and supports modern Java environments. Running current JDBC drivers with Java 21 generally provides better compatibility and security than relying on outdated Java 8 installations.

    Second, many development environments have already moved beyond Java 11. Popular frameworks, build systems, and enterprise applications increasingly test against Java 17 and Java 21. Choosing one of these versions reduces future migration work.

    Third, security updates matter more than many administrators realize. Older Java versions frequently remain installed for years after support has ended. That creates unnecessary exposure to known vulnerabilities. So even if an older Stack Builder package technically works with Java 8, using a supported LTS release is usually the safer path.

    Here is a practical compatibility overview:

    But compatibility is not purely about version numbers.

    Some Stack Builder packages were developed years ago and have not been updated recently. In those cases, installation documentation may specifically mention Java 8. If that occurs, installing a secondary Java version alongside Java 21 can be a practical solution. Modern operating systems support multiple Java installations when environment variables are configured correctly.

    Here’s the thing: many users assume PostgreSQL installation errors automatically point to a database problem. In reality, a failed extension installer, reporting package, or third-party management tool often traces back to Java configuration rather than PostgreSQL itself.

    And that distinction matters when diagnosing installation failures.

    Practical angle

    Suppose you are setting up PostgreSQL for software development, data analysis, business applications, or educational projects. The Java version you choose can influence future flexibility even if the database works immediately.

    For students and learners, installing Java 21 LTS alongside PostgreSQL creates an environment aligned with current industry practices. Many university courses, online tutorials, and enterprise training programs increasingly reference modern Java releases.

    For software developers, the decision affects application compatibility. A Spring Boot application connecting to PostgreSQL through JDBC will generally integrate more smoothly with Java 17 or Java 21 than with aging Java 8 installations. That becomes especially relevant when deploying to cloud platforms or containerized environments.

    Database administrators face a different concern. Stability usually outweighs experimentation. In production environments, Java 21 LTS offers a predictable support window while remaining modern enough to avoid compatibility concerns with current tooling.

    Realistically, the only strong reason to prefer Java 8 today is a documented dependency from a legacy package that has not been updated. Even then, many organizations maintain Java 8 solely for that specific application while using newer Java versions for everything else.

    A limitation worth acknowledging is that not every Stack Builder package follows the same development timeline. Some extensions receive frequent updates, while others may remain unchanged for years. Because of that, package-specific documentation should always take precedence over generic recommendations.

    What to know going forward

    The Java landscape continues moving toward regular LTS adoption cycles. Java 17 remains widely supported, but Java 21 increasingly represents the default recommendation for new installations.

    Future PostgreSQL releases are expected to maintain strong compatibility with modern Java environments through JDBC and associated development tools. That means users who standardize on Java 21 today are unlikely to encounter major compatibility barriers in the near term.

    And newer Java releases typically bring performance improvements, garbage collection enhancements, and security updates that benefit enterprise workloads over time.

    The broader trend is clear: PostgreSQL itself remains independent of Java, yet the surrounding ecosystem increasingly favors current LTS versions rather than legacy runtimes.

    So when evaluating the most uptodate java for stack builder and postgresql install, the conversation is really about balancing modern support with package-specific requirements. For most users, Java 21 LTS achieves that balance effectively.

    Closing

    Choosing the correct Java version is less about making PostgreSQL work and more about ensuring every supporting tool works reliably around it. The database engine itself rarely creates the confusion; companion utilities and extensions are usually where compatibility questions emerge.

    A practical next step is to install PostgreSQL first, then review the exact Stack Builder packages you plan to use. If no package explicitly requires an older runtime, Java 21 LTS remains the strongest choice for new PostgreSQL installations in 2026, offering a sensible mix of compatibility, security, and long-term support.

  • difference between a b and a c perhaps

    difference between a b and a c perhaps

    Difference Between A, B and C Perhaps: Understanding How Variables and Choices Are Compared

    A small letter can completely change the meaning of a problem. Many students first see symbols like A, B, and C in mathematics, science, reasoning questions, or programming and assume they are just random labels. The difference between A, B and C perhaps depends on the context where these symbols appear, but the deeper idea is comparison: understanding what each element represents and how it relates to the others.

    By the end of this guide, you will understand how A, B, and C are used as variables, categories, options, and values. You will also learn how to avoid the common mistakes that appear in exams and practical situations.

    Core Concept and Definition of A, B and C Differences

    Letters such as A, B, and C become meaningful because they represent something else. In mathematics, they commonly work as variables, which means symbols that can hold different values depending on the problem. In another subject, they may represent choices, groups, grades, objects, or conditions.

    A variable is a symbol used to represent an unknown or changing quantity. For example, in the equation A + B = C, the letters are not alphabet characters anymore. They represent quantities connected through a mathematical relationship.

    But context decides everything.

    A, B, and C in an algebra equation are different from A, B, and C options in a multiple-choice exam. In algebra, their values are usually calculated. In classification systems, they may identify different groups (such as category A, category B, and category C). This distinction matters because students often try to apply one meaning everywhere — and that creates confusion.

    And this is why textbooks, competitive exams, and technical fields always define symbols before using them.

    For example:

    The exact interpretation depends on the subject area (which is why reading the given information carefully matters).

    Deep Explanation With Examples of A, B and C

    Understanding A, B, and C becomes much easier when you see them working inside real examples. Symbols are not the difficult part. The relationship between symbols is where learning happens.

    Consider this basic algebra example:

    A = 5
    B = 10

    Find C if:

    A + B = C

    Step 1: Replace the letters with given values.

    5 + 10 = C

    Step 2: Calculate the result.

    15 = C

    So C equals 15.

    Here, A and B are input values, while C is the output value. The formula shows their connection. Changing A or B will automatically change C.

    Now imagine another example:

    A = length
    B = width
    C = area

    For a rectangle:

    C = A × B

    If:

    A = 8 cm
    B = 4 cm

    Then:

    C = 8 × 4
    C = 32 square cm

    The letters are different, but the thinking process remains the same — identify what each symbol represents before solving.

    And sometimes A, B, and C are not numbers at all.

    Example from a reasoning test:

    A = Beginner level
    B = Intermediate level
    C = Advanced level

    Here, there is no calculation. The difference is based on classification. A person at level C is not “larger” mathematically than a person at level A; they simply belong to another category.

    But students often mix these situations. They see letters and immediately search for formulas, even when the question is asking for comparison or explanation.

    Here’s the thing: the real skill is not memorising what A, B, and C mean. The skill is learning how to decode their meaning from the situation.

    Another useful example comes from programming:

    A = 20
    B = 30
    C = A + B

    The computer stores values in variables and calculates:

    C = 50

    A programmer could later change A to 40, and the final result would also change. This shows the purpose of variables: they make systems flexible.

    However, there is a limitation. Letters alone do not provide enough information. If someone simply writes “find the difference between A, B and C” without explaining the subject, there may not be one correct answer. Extra details are required to know whether they are numbers, groups, choices, or labels.

    Real-World Applications of Understanding A, B and C

    These simple-looking symbols appear in many real situations because they make information easier to organise. Students meet them in school exams, competitive tests, science problems, computer programming, and data analysis.

    In mathematics exams, A, B, and C may represent unknown values inside formulas. For example, quadratic equations often use letters to represent coefficients:

    ax² + bx + c = 0

    In this case, a, b, and c are fixed numbers that affect the shape and solution of the equation.

    So the same letters can have a completely different purpose depending on the chapter.

    In science experiments, variables are also compared. One condition may be labelled A, another B, and another C. Researchers then observe differences in results. This makes experiments easier to track — especially when many items are being tested.

    Businesses also use categories like A, B, and C. For example, ABC analysis in inventory management divides items based on importance and value. Category A items usually receive the highest attention because they have the greatest impact.

    The truth is, these letters continue appearing because they are simple, flexible, and internationally understood.

    Common Mistakes and Misconceptions About A, B and C

    Many learners struggle because they treat every symbol as having a permanent meaning. A does not always mean the first number. C does not always mean the answer. The question decides the role.

    One common mistake is assuming alphabetical order means value order.

    For example:

    A = 100
    B = 20
    C = 5

    Here, A is greater than C. But another question could define:

    A = 1
    B = 50
    C = 200

    Now C is greater.

    Or the letters may not represent size at all.

    Another mistake happens when students ignore units. If A represents distance and B represents time, adding them directly may make no sense. Correct formulas depend on compatible quantities.

    A third misunderstanding appears in multiple-choice questions. Some students think option C is somehow more likely because they notice patterns from previous exams. Realistically, answer labels are only identifiers and should not influence problem-solving.

    Good learners always ask: “What does this symbol represent here?”

    That single habit prevents many errors.

    What to Study Next After Learning A, B and C Differences

    Understanding the difference between A, B and C perhaps is really about understanding symbols, relationships, and context. Once you become comfortable with this idea, study variables, algebraic expressions, formulas, and logical reasoning patterns.

    Practise by taking simple equations and changing the values of A, B, and C yourself. Watch how the result changes.

    The next useful step is learning dependent and independent variables because that explains why changing one value can affect another. Master that concept, and many maths, science, and technical problems become much easier to understand.

  • hotel room count extraction problem missing website

    hotel room count extraction problem missing website

    hotel room count extraction problem missing website

    The most frustrating data extraction failures are often not caused by broken code. A hotel room count extraction problem missing website situation usually means the system expected to collect room inventory data from a hotel source, but the original website, page, or structured data path cannot be reached anymore. The hotel room count extraction problem missing website error stops workflows because the extractor has no trusted location to verify room numbers.

    This problem appears frequently in hotel databases, travel data projects, scraping pipelines, and research datasets where room counts are collected automatically. The failure looks simple from outside, but in real environments the cause can be anything from a removed hotel website to a crawler configuration mistake. Fixing it requires checking the data source first — not blindly changing extraction logic.

    What causes this

    Most extraction failures start before the parser even reads the hotel information. The extraction tool depends on a source URL, and when that URL disappears or changes structure, the room count field becomes unavailable. A missing website does not always mean the hotel closed. Sometimes the hotel moved from its independent website to a booking platform, changed domains, or removed detailed property pages during a redesign.

    And one common mistake users make is repeatedly running the same extraction script expecting different results. In actual troubleshooting work, this usually only produces the same empty values because the source connection itself is failing. The extractor cannot collect a room count from HTML that no longer exists.

    Another frequent cause is outdated crawling data. A database may still contain an old address such as https://hotel-example.com/rooms.html, but the live website may now use a different path like https://hotel-example.com/accommodation. Automated tools usually store previous URLs (especially in large hotel datasets), so one changed folder name can break thousands of records.

    Technical blocking also creates this problem. Some hotel websites prevent automated requests using security systems, firewall rules, or bot detection. The website exists for normal visitors, but the extraction system receives a blocked response such as HTTP 403 Forbidden, 404 Not Found, or sometimes a blank JavaScript-rendered page.

    But there is another overlooked cause: the hotel never published its room count online. Smaller properties may only show room types, photos, and booking options without mentioning total inventory. In that case, the extractor is not failing; the required data simply is not available from that source.

    Different extraction systems behave differently here — some return a missing website message, while others show empty fields, timeout errors, or incomplete records.

    How to fix it

    A proper fix starts by finding where the information flow breaks. Changing code before checking the source usually wastes time.

    1. Verify the original hotel website manually

    Open the saved hotel URL in a normal browser first.

    Check whether the domain loads correctly. If you see a browser error, expired domain page, or unrelated website, update the source URL before touching the extractor.

    For command-line verification, use:

    curl -I https://examplehotel.com

    This checks the HTTP response headers. A working website normally returns a status like 200 OK. A response like 404 Not Found means the page path is unavailable, while 301 or 302 means the website has moved somewhere else.

    Follow redirects carefully because a new page may contain the same hotel details.

    1. Check whether the room count exists on the new page

    Many users assume the extraction failed because no number appeared. Realistically, the truth is that many modern hotel websites have removed exact room counts from public pages.

    Search the page manually for terms like:

    rooms

    keys

    accommodation

    guest rooms

    suites

    If there is no visible number, inspect structured data.

    Open the webpage source and search for:

    application/ld+json

    Some hotels store information inside JSON-LD schema instead of visible text. Extractors that only read HTML paragraphs may miss this information.

    1. Update the extraction selector or parser

    If your extraction script depends on CSS selectors, verify that the website layout did not change.

    An old selector might look like:

    .hotel-room-count

    After a redesign, the same information may move into:

    .property-details .rooms

    For Python scraping workflows using BeautifulSoup, check the returned HTML:

    print(response.text[:1000])

    This confirms whether your script receives the actual website content or a blocked page.

    And avoid replacing selectors randomly. Find the exact HTML element containing the room count, then update the parser.

    1. Test JavaScript rendering issues

    Some hotel websites load details after the first page request. Basic tools like requests may receive an incomplete page.

    A quick test is comparing:

    Browser view

    Saved scraper response

    If the browser shows room information but your extraction output does not, use a rendering solution such as Playwright.

    Example:

    playwright install chromium

    Then load the page through a browser-controlled session.

    Remember that automated browsing increases resource usage (especially when processing thousands of hotel records), so apply it only where required.

    1. Add fallback sources safely

    When the official website is unavailable, check alternative verified sources.

    Possible options include hotel chain databases, property documents, or trusted travel listings. Avoid copying random numbers from outdated pages because hotel room inventory changes after renovations.

    So the correct fix is not just filling the missing value. The goal is keeping the dataset accurate.

    If that didn’t work

    Some cases require deeper checking because hotel data systems are not all built the same way.

    The first alternative cause is geographic or network blocking. A hotel website may work from one country but block server traffic from another location. Test the URL from another network or check server logs for access restrictions. If requests repeatedly return 403, adjust your collection method according to the website rules.

    Another possibility is database mapping failure. The website may exist, and the room count may exist, but the hotel ID points to the wrong property. This happens after hotel rebranding, mergers, or ownership changes — the extractor is technically working but looking at the wrong record.

    Check fields like:

    Or the issue may come from API changes. Some platforms remove fields, rename responses, or require authentication updates. Review API documentation and confirm whether the room count attribute is still provided.

    The limitation is that not every missing room count can be recovered automatically. Some information requires direct confirmation from the property.

    How to prevent it

    Reliable hotel extraction systems need regular source checking, not only error fixing after failures appear.

    Schedule URL validation before running large extraction jobs. A simple status check can detect dead websites before thousands of missing records appear.

    Keep historical source information as well. Store the original URL, extraction date, HTTP status, and method used to collect the room count. This makes future troubleshooting much faster.

    And always separate “missing because of an error” from “missing because unavailable.” They are different problems.

    Build fallback logic carefully — one source disappearing should not destroy the entire data workflow.

    For important datasets, review samples manually after major hotel website redesign periods or supplier changes. Automation works best when combined with occasional verification.

    Closing

    A hotel room count extraction problem missing website message is usually a source reliability issue before it is a technical failure. Start with the website, confirm the data exists, then repair the extraction method.

    Random fixes often hide the real problem and create inaccurate hotel records later. Check URLs, inspect responses, update selectors, and document changes. Once the actual failure point is identified, most extraction problems become straightforward to solve and much easier to prevent in future data collection projects.

  • How long does red wine last after opening

    How long does red wine last after opening

    Learn how long red wine lasts after opening, what affects freshness, and how to store it properly to keep flavor, aroma, and quality intact.

    Most people notice the smell before they notice the taste. A bottle that seemed perfectly fine two nights ago suddenly carries a flat, slightly sour scent, and the fruit that once tasted rich now feels dull and thin. That shift happens because wine is alive in a small chemical sense. Once oxygen enters the bottle, the clock starts moving.

    Knowing how long does red wine last after opening matters for more than avoiding waste. It affects flavor, food pairing, texture, and even whether a wine still reflects what the winemaker intended. Some reds collapse quickly after exposure to air, while others soften beautifully for a day or two before fading. Storage conditions, tannin level, alcohol content, and the type of closure all play a role. And realistically, many people rely on rough guesses instead of understanding what actually changes inside the bottle.

    The good news is that opened red wine usually gives clear signs before it becomes unpleasant. The challenge is knowing what those signs mean.

    Background and context

    Red wine changes the moment the cork comes out. Oxygen begins interacting with compounds responsible for aroma, structure, and color. At first, that exposure can improve the wine. A tight Cabernet Sauvignon may open up after an hour, showing more fruit and softer tannins. But after too much oxygen exposure, the same reactions start degrading the wine instead of helping it.

    Most opened red wines last between 3 and 5 days when stored correctly in the refrigerator with a cork or stopper. Lighter reds such as Pinot Noir often lose freshness faster, sometimes within 2 or 3 days. Fuller-bodied wines with higher tannin and acidity — wines like Syrah, Malbec, or Cabernet Sauvignon — usually hold up longer.

    Temperature matters more than many people realize. Wine left uncorked on a warm kitchen counter overnight can taste noticeably flatter by the next evening. Refrigeration slows oxidation dramatically, even for red wine. And yes, storing red wine in the fridge after opening is standard practice among sommeliers and wine professionals.

    Sweetness also affects longevity. Fortified wines such as Port can last weeks because higher alcohol and sugar act as preservatives. Meanwhile, delicate natural wines with minimal sulfur protection may fade surprisingly fast (sometimes within a single day).

    But there is nuance here. An opened bottle is not automatically “bad” after a fixed number of days. Wine quality declines gradually. Some bottles simply become less expressive before they become undrinkable.

    The main substance

    The lifespan of opened red wine depends largely on four factors: oxygen exposure, wine structure, storage temperature, and bottle volume remaining. Most articles stop at a generic “3 to 5 days,” but the details behind that range explain why two opened wines can behave completely differently.

    Take Pinot Noir as an example. Its lighter body and lower tannin content make it more vulnerable to oxidation. After opening, bright cherry and floral notes can disappear quickly, leaving muted acidity and earthy flavors behind. A Napa Valley Cabernet Sauvignon behaves differently because tannins and alcohol create more resistance to oxygen exposure.

    And the amount left in the bottle matters more than people think. Half a bottle contains far more air relative to wine volume than a nearly full bottle. That larger oxygen ratio speeds oxidation considerably. A wine that tasted vibrant on day two may taste tired on day four simply because the bottle was mostly empty.

    Here is a practical breakdown:

    Type of Red Wine Typical Freshness After Opening
    Pinot Noir 2-3 days
    Merlot 3-4 days
    Cabernet Sauvignon 4-5 days
    Syrah/Shiraz 4-5 days
    Fortified red wines 2-4 weeks

    Storage technique changes outcomes dramatically. Recorking the bottle tightly and refrigerating it can extend freshness by several days compared with leaving it exposed at room temperature. Vacuum wine stoppers remove some oxygen from the bottle and often add another day or two of acceptable quality.

    Argon gas preservation systems — widely used in restaurants and tasting rooms — slow oxidation even more by replacing oxygen with inert gas. These systems are effective, though often unnecessary for casual wine drinkers who finish bottles within a few days.

    Signs of spoiled red wine are usually easy to detect once you know what to look for. The fruit aromas weaken first. Then the wine may smell vinegary, nutty, stale, or sharp in a way that feels disconnected from the original profile. Color can shift toward brownish brick tones, especially around the edges.

    But not every flavor change means spoilage. Some wines evolve after opening in interesting ways. A structured Barolo, for instance, may taste smoother and more aromatic on day two than it did immediately after uncorking. So the truth is, drinking wine slightly past its peak is often a quality issue rather than a safety issue.

    That distinction matters. Oxidized wine is generally not dangerous to consume unless it has been contaminated or stored improperly for an extended period. It simply tastes worse.

    One common misconception involves “cooking wine.” People often assume heavily oxidized wine is still fine for recipes. Sometimes that works, but badly spoiled wine can carry sour or acetic flavors directly into sauces and stews. If the wine smells unpleasant in the glass, it usually will not improve in the pan.

    Practical angle

    Most people are not opening bottles in controlled cellar conditions. They are pouring a glass during dinner, recorking the bottle loosely, then forgetting about it until later in the week. That everyday reality shapes how long opened red wine actually lasts.

    If you drink wine occasionally, smaller bottles may make more sense than standard 750 ml bottles. Half-bottles reduce waste and limit oxygen exposure after opening. Restaurants increasingly use preservation systems because expensive reds can deteriorate quickly once exposed to air — especially during slower service nights.

    And there is a seasonal factor people rarely discuss. Opened wine deteriorates faster in warmer homes. During summer months, a bottle left near a sunny countertop may age noticeably within hours. Even indirect heat accelerates oxidation.

    For people who enjoy collecting wine, proper storage becomes more than convenience. Older red wines are often less stable after opening because their tannin structure has already softened with age. A mature Bordeaux from the early 2000s might lose complexity within a single evening, while a young Australian Shiraz could remain expressive for days.

    Serving habits also influence preservation. Pouring small glasses repeatedly exposes the bottle to fresh oxygen each time it opens. Decanting speeds that process further because it dramatically increases surface area. Decanting can improve young wines beautifully, but it also shortens the window before decline begins.

    So if you plan to save wine for several days, avoiding prolonged decanting helps preserve freshness longer.

    One honest caveat: there is no universal expiration rule because wines vary enormously in composition. Low-intervention natural wines, heavily oaked reds, filtered commercial blends, and high-acid Italian wines all react differently once opened. Two bottles from the same grape variety may age differently depending on region, vintage, and production methods.

    What to know going forward

    The safest approach is to think about opened red wine in terms of flavor quality rather than strict expiration. Most bottles remain enjoyable for several days if refrigerated and sealed properly, but the drinking experience changes continuously during that period.

    Wines with stronger tannin structure and higher acidity generally last longer. Delicate reds fade faster. Refrigeration slows oxidation significantly, even though many people still assume red wine should never enter a fridge. And smaller oxygen exposure almost always means longer freshness.

    Pay attention to smell first. Flat fruit, vinegar-like sharpness, or stale nutty aromas usually indicate oxidation has progressed too far. But subtle changes do not automatically ruin a wine. Sometimes those shifts create softer textures and more open aromas that certain drinkers actually prefer.

    Or put another way: an opened bottle rarely transforms from perfect to terrible overnight. It declines gradually, and your own taste threshold matters.

    Closing

    Wine rewards attention. Not in a pretentious way, but in the small practical details that change whether a bottle still tastes alive three days later. Understanding how long does red wine last after opening helps you waste less, enjoy better flavor, and recognize when storage habits are working against you.

    The next time you open a bottle, refrigerate it after pouring, seal it tightly, and taste it again the following day with intention. You will notice the evolution immediately — and that is part of what makes wine interesting in the first place.

  • Can you take nail clipper on plane

    Can you take nail clipper on plane

    Learn whether you can take nail clippers on a plane, TSA rules for carry-on and checked bags, international travel tips, and items to avoid packing.

    Airport security has a strange way of turning ordinary objects into sources of stress. A water bottle suddenly matters. A forgotten coin pocket becomes a delay. And something as harmless as a nail clipper can make travelers second-guess their entire carry-on bag. That hesitation is understandable because airline rules are not always explained clearly, especially when different countries and airports apply security standards a little differently.

    For most travelers, the short answer to “can you take nail clipper on plane” is yes. Standard nail clippers are generally allowed in both carry-on and checked luggage on most commercial airlines. But the details matter more than people realize. Clippers with attached tools, unusually sharp grooming kits, or international airport restrictions can change what happens at security screening. And when you are already rushing to a gate, the last thing you want is a bag inspection over a manicure tool.

    Background and context

    Security rules around personal grooming items changed dramatically after the early 2000s when airport screening standards tightened across the world. Before then, passengers rarely thought about whether nail scissors, tweezers, or small metal tools could travel in a cabin bag. Now, even tiny objects get examined through the lens of aviation security.

    In the United States, the Transportation Security Administration allows standard nail clippers in carry-on baggage. Similar policies exist with many global aviation authorities, including airports following European Union and UK security guidelines. But regulations are not identical everywhere — and that distinction matters more during international trips than domestic ones.

    Some grooming kits include extras such as miniature knives, pointed cuticle trimmers, or scissors longer than permitted cabin limits. Those items may trigger additional screening or confiscation. Realistically, most travelers run into trouble not because of the nail clipper itself, but because of the attached accessories hidden inside a travel grooming set.

    And airport security officers still retain discretion. A tool technically allowed under policy can occasionally be removed if it appears unusually sharp or suspicious during screening. That does not happen often, though it explains why frequent travelers sometimes get inconsistent experiences from one airport to another.

    Another layer of confusion comes from airline rules versus airport security rules. Security agencies decide what enters the cabin. Airlines may separately regulate sharp objects depending on local laws or operational policies (particularly on smaller regional flights).

    The main substance

    Most standard nail clippers fall well within approved carry-on guidelines because they are considered low-risk grooming tools. Small folding clippers without blades extending outward are rarely flagged during screening. TSA officers in the US routinely allow them through checkpoints, and similar treatment applies in many countries including Canada, Australia, and much of Europe.

    But grooming tools are not all treated equally.

    Multi-function nail kits create the biggest gray area. A common example is a clipper with a built-in nail file that tapers into a pointed metal edge. Some sets also include attached folding knives or miniature scissors. The truth is, security staff may focus less on the clipper itself and more on whether another component could be used as a sharp instrument.

    Here is where travelers often get confused:

    Item Carry-On Usually Allowed? Checked Bag Allowed?
    Standard nail clipper Yes Yes
    Metal nail file Usually yes Yes
    Cuticle cutter Sometimes restricted Yes
    Nail scissors under 4 inches Usually yes in US Yes
    Swiss Army-style grooming tool May be restricted Yes

    Length measurements matter too. In the United States, scissors shorter than 4 inches from the pivot point are generally allowed in carry-on bags. In the UK and parts of Europe, cabin baggage restrictions can be stricter depending on airport interpretation. So a manicure set that passed screening in New York may still attract attention in London or Dubai.

    And there is another overlooked factor: secondary screening technology. Modern airport scanners detect dense metal clusters inside packed bags. A tightly packed toiletry pouch full of metal grooming items can trigger a manual inspection even when every object is technically permitted. Travelers sometimes mistake that inspection for confiscation risk when it is simply a closer security check.

    Frequent flyers often separate nail clippers into an easily accessible pouch for this reason alone. It speeds up inspections and reduces stress during busy screening lines.

    Here’s the thing most airline blogs skip: airport culture affects enforcement. In some countries, security agents take an extremely literal approach to regulations. In others, officers apply more practical judgment. Japanese airports, for example, are known for orderly and detail-focused screening procedures, while some smaller regional airports may inspect grooming kits less aggressively. Neither approach is wrong; they simply reflect operational differences.

    So while the rule itself sounds simple, the real-world experience depends on airport staff, local policies, scanner technology, and the exact type of grooming tool packed inside your bag.

    Practical angle

    Packing nail clippers correctly is less about avoiding confiscation and more about reducing friction during travel. A basic clipper tossed loosely into a backpack rarely causes problems. A dense grooming pouch filled with metallic tools, however, can slow down security checks quickly.

    For carry-on luggage, keep grooming items together in a transparent or easily reachable pouch. That small habit makes secondary inspections much faster. And if you are carrying anything with blades, detachable scissors, or pointed cuticle tools, placing them in checked baggage is often the safer choice.

    Business travelers already understand this pattern. Many avoid expensive grooming kits entirely when flying because replacing confiscated tools overseas becomes expensive and inconvenient. A cheap pharmacy clipper is easier to lose than a premium stainless-steel grooming set that costs over $80.

    But there is also a hygiene angle people overlook. Nail clippers carried loosely inside bags collect lint, dust, and bacteria from travel surfaces. Storing them in a protective sleeve or small pouch matters more than most travelers realize, especially during long international trips.

    Families traveling with children should pay extra attention to compact baby-care kits. Some infant nail care sets include tiny scissors or medical-style trimmers that appear harmless but may still trigger screening questions. Keeping manufacturer packaging or separating items clearly can help avoid delays.

    Or consider connecting flights between countries with different screening rules. An item accepted during departure might face inspection during transit abroad. That happens more often with manicure kits purchased at airport shops after security screening. Travelers assume duty-free or airport-purchased items are automatically acceptable everywhere, but transit security may still inspect them.

    One honest caveat: rules can change unexpectedly after security incidents or policy updates. Checking the official airport or aviation authority website before international travel remains the safest move, especially for travelers carrying specialized grooming tools.

    What to know going forward

    Airport security is moving toward more advanced scanning systems capable of analyzing objects without requiring travelers to remove them from bags. That shift will probably reduce confusion around small grooming tools over time. Several airports already use CT scanners that generate detailed three-dimensional images of carry-on contents, making it easier for officers to distinguish ordinary nail clippers from prohibited sharp objects.

    But human judgment will still play a role. Security officers assess context, object shape, and passenger behavior alongside written rules. So even though standard nail clippers are widely accepted, unusual grooming kits or tactical-style multi-tools may continue to attract extra scrutiny.

    Travelers should also expect increasing variation between countries rather than full global standardization. Aviation authorities share broad safety principles, yet local implementation still differs. That means frequent international flyers benefit from checking destination-specific guidance instead of assuming every airport follows identical standards.

    And small conveniences matter more during travel than people think. Something as simple as packing a basic nail clipper in the right place can save time, avoid unnecessary stress, and keep a security line moving smoothly.

    Closing

    A nail clipper rarely feels like an important travel item until airport security turns it into a question mark. Fortunately, standard clippers are allowed on planes in most cases, including carry-on bags. Problems usually come from attached tools, oversized manicure kits, or differing international rules rather than the clipper itself.

    Before your next flight, take two minutes to inspect your grooming kit carefully. Remove anything unusually sharp, pack questionable tools in checked luggage, and check the security guidelines for the countries you are visiting. That small bit of preparation can make the airport experience noticeably smoother.

  • Which of the following is true of compressed urls

    Which of the following is true of compressed urls

    Learn which statements about compressed URLs are true, how URL shortening works, why businesses use it, and the risks users should know.

    Which of the following is true of compressed urls

    Long web addresses rarely survive modern internet behavior. They get cut off in text messages, break in emails, and look messy on social posts. That is why compressed URLs exist. The true statement about compressed URLs is that they shorten long web addresses into smaller, easier-to-share links that redirect users to the original destination.

    That simple answer is usually what exams, digital literacy quizzes, and cybersecurity courses are testing. But there is more behind it. Compressed URLs save space, improve readability, and help companies track clicks. At the same time, they can also hide the real destination of a link, which creates security concerns.

    And that mix of convenience and risk is exactly why people keep asking about them.

    The full picture

    A compressed URL is created through a URL shortening service. Instead of displaying a long web address filled with categories, tracking parameters, and random characters, the service generates a shorter version that redirects to the original page.

    For example, a long product link from an online store might contain dozens of extra characters. A compressed URL turns that into something short enough to fit neatly into a message or social media post. When someone clicks it, the shortening service forwards the browser to the actual destination.

    That forwarding process is the key detail many people miss.

    The compressed link is not a different webpage. It is simply a redirect. The original page still exists exactly where it was before. The shortened link acts like a pointer that sends visitors there automatically.

    Businesses use compressed URLs for several reasons:

    Purpose Why It Matters
    Sharing Short links fit better in texts, social posts, and printed material
    Tracking Companies can measure clicks, locations, and user behavior
    Branding Custom short links look cleaner and more professional
    Error reduction Short links are easier to copy or type manually

    But compressed URLs also create confusion because the destination is hidden until the user clicks. That limitation matters — especially in phishing scams and fake promotional messages.

    Cybercriminals sometimes use shortened links to disguise malicious websites. Instead of showing a suspicious address directly, they hide it behind a compressed URL. The user sees only a short string of characters and may assume it is safe.

    So while compressed URLs themselves are not dangerous, they can be misused.

    Realistically, this is why many cybersecurity awareness programs mention them. Employees are often trained not to trust shortened links blindly, especially from unknown senders.

    Another detail worth understanding is that compressed URLs do not permanently “compress” a webpage or reduce internet size. People occasionally misunderstand the term and think the website itself becomes smaller or faster. That is incorrect. The URL is shortened, not the content of the site.

    And there is another technical layer behind the scenes. Most URL shorteners rely on HTTP redirects, commonly 301 or 302 redirects, to move users from the short link to the destination page. Search engines understand these redirects, which is why shortened links usually still pass traffic correctly and often preserve search ranking signals.

    Some services also allow custom aliases. Instead of random characters, a company can create a branded short link like “brand.link/sale.” These are easier to remember and often improve click-through rates because users recognize the brand name.

    But here’s the thing: not all shortened links last forever. If the shortening service shuts down, the links may stop working completely. That is one downside organizations sometimes overlook when building marketing campaigns around third-party URL shorteners.

    Common true statements about compressed URLs

    Many quizzes phrase the question differently, but the correct ideas usually stay the same. Here are statements that are generally true of compressed URLs:

    Statement True or False
    Compressed URLs are shorter versions of long web addresses True
    They redirect users to the original webpage True
    They can hide the final destination of a link True
    They permanently compress website files False
    They always make websites load faster False

    That last point causes confusion fairly often. A compressed URL might appear cleaner and simpler, but it does not automatically improve website performance. In fact, there is technically an extra redirect step before the user reaches the destination.

    Usually that delay is tiny. Still, the shortened link itself is not a speed optimization tool.

    Related questions people also ask

    Are compressed URLs safe?

    Most compressed URLs are safe when created by trusted businesses or recognized shortening services. Problems arise when attackers use them to disguise harmful destinations. Because users cannot immediately see the final web address, shortened links sometimes appear in phishing emails, fake giveaways, or scam text messages.

    One practical habit helps a lot: hover over the link before clicking when possible, or use a URL expansion tool that reveals the destination.

    Do compressed URLs affect SEO?

    They can, depending on how the redirect is handled. Properly configured redirects usually preserve SEO value and direct users correctly. Many major brands use shortened URLs in marketing campaigns without harming their search visibility.

    But excessive redirect chains can create issues. Search engines prefer clear, efficient paths between pages.

    Why do social media platforms use compressed URLs?

    Character limits are one reason, though not the only one. Platforms and marketers also use them for analytics. A shortened link can track how many people clicked, where the clicks came from, and which campaign performed best.

    And branded short links tend to look cleaner in posts and advertisements than long strings filled with tracking parameters.

    Can you find the original URL behind a compressed link?

    Usually yes. Many online tools preview or expand shortened URLs before you open them. Some browsers and security tools also check the destination automatically.

    That said, not every expansion tool catches every malicious link. Users still need basic caution when dealing with unfamiliar messages.

    Real-world relevance

    This topic matters more than many people expect because compressed URLs appear almost everywhere — marketing emails, QR codes, social media ads, mobile apps, and even printed posters. Knowing how they work helps people recognize both legitimate business practices and potential scams.

    Students encounter questions about compressed URLs in digital literacy courses, IT certifications, and cybersecurity training. Professionals see them daily in analytics dashboards and advertising campaigns. And ordinary users click them constantly without always realizing what is happening behind the scenes.

    So understanding the basic truth about compressed URLs is not just test knowledge. It is part of understanding how modern web communication actually works.

    Closing

    The correct understanding is straightforward: compressed URLs shorten long web addresses and redirect users to the original destination. They make links easier to share and track, but they can also conceal where a link truly leads.

    A smart next step is learning how to preview shortened links safely before clicking them. That single habit reduces the risk of phishing scams while still letting you use compressed URLs confidently.

  • Recommend a great backpack for a digital nomad

    Recommend a great backpack for a digital nomad

    Find the best backpack for digital nomad life with smart carry options, laptop protection, airline-friendly sizing, and long-term comfort.

    Recommend a great backpack for a digital nomad

    Somewhere between airport security bins, overnight buses, and cramped café tables, a backpack stops being luggage and starts becoming infrastructure. The people who travel full time learn this fast. A zipper that sticks in Bangkok humidity or shoulder straps that dig in after a four-hour layover become daily problems, not minor inconveniences.

    That is why choosing a great backpack for a digital nomad is less about style than friction reduction. The right bag quietly handles border crossings, protects expensive gear, fits under airline seats, and survives sidewalks that were never designed for rolling luggage. And unlike traditional travel bags, a nomad backpack has to work in two worlds at once: mobile office and everyday carry.

    Most online recommendations stop at brand names. But the real difference comes from understanding capacity, weight distribution, carry-on dimensions, weather resistance, laptop protection, and how the bag behaves after six straight months of use. Those details matter far more than flashy marketing photos.

    Background and context

    Digital nomad travel changed backpack design over the last decade. Earlier travel packs were mostly adapted hiking bags—huge top-loaders with dangling straps, narrow laptop sleeves, and awkward organization. They worked on mountain trails but felt clumsy in airports and coworking spaces.

    Modern nomad backpacks are built around electronics and urban mobility. Most serious travel backpacks now include suspended laptop compartments, clamshell openings, hidden passport pockets, lockable zippers, and water-resistant materials such as ballistic nylon or recycled ripstop polyester. Airlines influenced this shift too. Carry-on restrictions pushed manufacturers toward the 35L to 45L range because those sizes usually avoid checked baggage fees while still holding enough clothing for long-term travel.

    And there is another reality many first-time nomads underestimate: weight compounds over time. A bag that feels acceptable walking from a taxi to a hotel can become exhausting during multi-city travel weeks. Hip belts, load lifters, and back-panel ventilation suddenly matter a lot more when someone is carrying a laptop, camera, chargers, clothes, toiletries, and documents through three transit systems in one day.

    Minimalism also plays a role, though not in the trendy social-media sense. Realistically, experienced travelers reduce gear because every extra item creates friction—more packing time, heavier transit days, and more things to track. The best backpack supports that mindset instead of encouraging overpacking.

    And unlike vacation luggage, a digital nomad backpack often becomes a daily office setup. That means quick-access compartments, comfortable harness systems, and reliable durability are not luxury features. They directly affect work routines.

    The main substance

    Several backpacks consistently stand out among long-term travelers because they solve real problems instead of just looking good online.

    The Peak Design Travel Backpack 45L is one of the strongest options for tech-heavy nomads. Its expandable design shifts from 35L to 45L, which helps during flights with stricter carry-on enforcement. The internal organization is unusually thoughtful, especially for camera gear and accessories. And the weatherproof recycled nylon shell handles rough travel conditions surprisingly well. The tradeoff is weight. Empty, it already feels heavier than minimalist competitors.

    For travelers who prioritize comfort over aesthetics, the Osprey Farpoint 40 remains one of the smartest buys. Osprey borrowed suspension technology from hiking packs, so the load sits better on the hips and shoulders during long walks. The laptop compartment placement is not perfect compared to newer urban travel bags, but the carrying comfort makes up for it. Many full-time travelers stick with this bag for years because it simply works.

    The Aer Travel Pack 3 appeals to remote workers who move between airports, coworking spaces, and city apartments rather than rugged outdoor environments. Its organization system is excellent without becoming cluttered. The laptop compartment easily protects larger devices, including 16-inch MacBook Pro models. But here’s the thing: the bag performs best for organized packers. People who prefer stuffing clothes quickly into open compartments may find it restrictive.

    Then there is the Tortuga Travel Backpack Pro, designed almost entirely around digital nomad workflows. The rectangular structure maximizes packing efficiency, especially for cube-based packing systems. The harness system distributes weight better than many urban-focused bags, and the materials feel durable enough for constant movement. Its biggest advantage is balance. It does many things well without leaning too hard into any single category.

    Some nomads prefer smaller setups entirely. A 28L to 32L bag paired with laundry access can create a much lighter travel experience. The Patagonia Black Hole Mini MLC and Evergoods Civic Travel Bag are strong examples of this philosophy. Smaller bags force discipline, but they move through cities faster and reduce airline stress dramatically.

    And size matters more than people expect. A fully packed 45L bag can easily exceed 10 kilograms, especially with electronics. Certain budget airlines in Europe and Southeast Asia increasingly enforce weight limits even on cabin baggage. That creates a hidden cost problem when travelers are forced into last-minute checked bag fees.

    Materials deserve attention too. High-denier nylon fabrics resist abrasion better than cheaper polyester blends, especially around corners and zippers. YKK zippers are widely trusted for a reason—they fail less often under heavy use. Small hardware details sound boring until a broken zipper traps your laptop inside a bag in another country.

    But no backpack is perfect. Some ultra-organized bags sacrifice flexibility. Some lightweight models compromise durability. Others excel in airports but feel uncomfortable during long walking days. Choosing well means deciding which compromises matter least for your travel style.

    Practical angle

    The best backpack depends heavily on how someone actually travels, not how they imagine nomad life will look.

    A slow traveler staying a month in each city can comfortably use a larger 40L to 45L setup because frequent transit is limited. In that scenario, extra clothing space and better organization make daily life easier. Someone moving every three or four days usually benefits from a smaller, lighter pack instead.

    Climate changes the equation too. Cold-weather travel demands bulkier clothing, which increases volume quickly. Tropical destinations allow much smaller setups because lightweight clothing dries fast and layers are minimal. And footwear becomes a hidden space killer. One extra pair of shoes can consume nearly the same room as several shirts.

    Laptop size matters more than most buyers expect. Some travel backpacks technically fit larger laptops but create pressure points against the back panel. Over time, that becomes uncomfortable during extended carry days. Checking real measurements—not just marketing claims—prevents this problem.

    Security is another practical concern. Bags with lockable zippers, hidden pockets, and understated branding often attract less attention in crowded transit hubs. Flashy travel gear sometimes signals expensive electronics inside. The truth is, low-profile designs tend to age better and create less stress.

    So packing style should influence backpack choice too. Travelers who use compression cubes, tech pouches, and structured organization usually prefer clamshell-opening travel packs. People who pack more casually may enjoy simpler bucket-style designs with fewer compartments.

    There is also a comfort factor many reviews barely mention: heat retention. Certain heavily padded back panels trap sweat aggressively in humid climates. Others sacrifice padding for airflow. Neither solution is universally better, but understanding the tradeoff matters before buying.

    And one overlooked detail can save enormous frustration: external water bottle access. Sounds minor. It is not. Constantly opening a backpack for basic items becomes irritating very quickly during long transit days.

    What to know going forward

    The digital nomad backpack market keeps moving toward hybrid designs that combine outdoor durability with office-friendly organization. More brands now build around USB battery storage, hidden tracking compartments, RFID-protected pockets, and modular packing systems. Some of these features help. Others feel like marketing extras.

    What consistently matters over time is simpler: comfort under weight, durable materials, practical compartment layout, and airline compatibility. Those fundamentals outlast trends.

    So before buying, pay attention to how a backpack fits your torso length and shoulders—not just online ratings. A highly rated bag can still feel terrible on the wrong body type. Whenever possible, testing a loaded backpack in person reveals far more than reading specifications.

    And avoid buying based purely on influencer travel videos. Many creators test backpacks for days. Long-term travelers test them for years.

    Closing

    A great backpack for a digital nomad does not announce itself loudly. Usually, the best ones disappear into the background because everything works the way it should. Airports become smoother. Packing becomes faster. Work gear stays protected. Moving between countries feels lighter, both physically and mentally.

    Start by deciding how you actually travel: fast or slow, minimal or gear-heavy, urban or mixed terrain. Then choose a bag that supports that reality instead of an aspirational version of it. That single decision affects almost every travel day that follows.

  • Which molecule is expected to have the smallest pka

    Which molecule is expected to have the smallest pka

    Which molecule is expected to have the smallest pKa, why acidity changes between molecules, and how chemists predict acid strength.

    Which molecule is expected to have the smallest pka

    Acidity questions in chemistry often look simple until two nearly identical molecules behave completely differently in water. The molecule expected to have the smallest pKa is always the strongest acid in the group because lower pKa values mean the molecule gives up a proton more easily. When students ask “which molecule is expected to have the smallest pKa,” the real challenge is usually understanding why one structure stabilizes its conjugate base better than another.

    And that is where most mistakes happen. People memorize trends without understanding what actually controls acidity.

    The full picture

    The smallest pKa belongs to the molecule that forms the most stable conjugate base after losing a proton. That single idea explains nearly every acidity comparison in general chemistry and organic chemistry.

    For example, hydrochloric acid has a much smaller pKa than water because chloride ion is far more stable after proton loss than hydroxide ion. Likewise, carboxylic acids are more acidic than alcohols because the negative charge in a carboxylate ion spreads across two oxygen atoms through resonance. An alkoxide ion cannot do that.

    Here is the underlying principle chemists actually use:

    More stable conjugate base = stronger acid = smaller pKa.

    Several structural effects influence that stability. Resonance is one of the biggest. When negative charge can spread across multiple atoms, the conjugate base becomes lower in energy. Inductive effects matter too — electronegative atoms nearby pull electron density away and help stabilize charge. Atom size also changes acidity because larger atoms distribute negative charge over a bigger volume.

    Consider this common comparison:

    Molecule Approximate pKa Reason
    Hydrochloric acid (HCl) -7 Very stable chloride ion
    Acetic acid 4.8 Resonance-stabilized conjugate base
    Water 15.7 Less stable hydroxide ion
    Ethanol 16 Alkoxide ion lacks resonance stabilization
    Ammonia 38 Very unstable conjugate base compared with oxygen systems

    Smaller pKa values indicate stronger acids. Negative pKa values usually correspond to very strong acids that dissociate almost completely in water.

    But chemistry instructors rarely ask these questions using isolated molecules. Most exam problems compare structures that differ by one feature — maybe an extra chlorine atom, an aromatic ring, or a nearby nitro group. The truth is, these questions are testing whether you can predict conjugate base stability rather than whether you memorized pKa numbers.

    Take chloroacetic acid versus acetic acid. Chloroacetic acid has the smaller pKa because chlorine withdraws electron density through induction, stabilizing the negative charge after deprotonation. Add more chlorines, and the pKa drops even further.

    And resonance effects are usually stronger than inductive effects when the negative charge can be genuinely delocalized instead of merely influenced from a distance.

    One caveat deserves attention here: exact pKa values can shift depending on solvent, temperature, and measurement method. A molecule’s relative acidity trend usually stays consistent, but the precise number is not always universal across every chemical environment.

    How chemists quickly predict the smallest pKa

    Experienced chemistry students often use a mental checklist rather than memorizing hundreds of values. The process becomes much faster once you know what to look for.

    First, identify the proton that can leave. Then examine the conjugate base formed afterward.

    Ask these questions:

    Can the negative charge spread through resonance?

    Is the charge sitting on a highly electronegative atom like oxygen, fluorine, or chlorine?

    Are electron-withdrawing groups nearby?

    Does aromatic stabilization appear after deprotonation?

    Or does the molecule create an unstable localized charge with nowhere for the electrons to go?

    A good example appears when comparing phenol and cyclohexanol. Phenol has the smaller pKa because the phenoxide ion can delocalize negative charge into the aromatic ring. Cyclohexanol cannot. The structures look deceptively similar at first glance — but their conjugate bases behave very differently.

    So when an exam asks which molecule is expected to have the smallest pKa, the safest strategy is usually not guessing from appearance. Follow the electrons.

    Related questions people also ask

    Does a smaller pKa always mean a stronger acid?

    Yes. Smaller pKa values correspond to stronger acids because the molecule donates protons more easily. A difference of even a few pKa units represents a large acidity difference because the scale is logarithmic.

    For example, a molecule with a pKa of 2 is far more acidic than one with a pKa of 5. That three-unit difference means the acid is about 1000 times stronger.

    Why are carboxylic acids more acidic than alcohols?

    After deprotonation, carboxylic acids form resonance-stabilized carboxylate ions. Alcohols form alkoxide ions, where the negative charge stays localized on one oxygen atom. The resonance stabilization lowers the energy of the conjugate base, which lowers the pKa.

    And this is one of the most frequently tested acidity trends in organic chemistry courses.

    Can electronegative atoms lower pKa?

    Yes, especially when they are close to the acidic proton. Electronegative substituents pull electron density away through inductive effects, stabilizing the conjugate base.

    For instance, trifluoroacetic acid is much more acidic than acetic acid because the three fluorine atoms strongly withdraw electron density. That stabilization dramatically lowers the pKa.

    Why do strong acids have negative pKa values?

    The pKa scale extends below zero for acids that dissociate extremely well in water. Hydrochloric acid, sulfuric acid, and perchloric acid are common examples. Their conjugate bases are exceptionally stable, making proton donation highly favorable.

    Realistically, once acids become very strong in water, comparing exact strengths gets more complicated because of leveling effects from the solvent itself.

    Real-world relevance

    Acidity is not just an exam topic buried in organic chemistry textbooks. pKa values shape how medicines dissolve in the body, how industrial reactions are designed, and even how environmental pollutants behave in water systems.

    Drug chemists pay close attention to pKa because it influences whether a compound exists in charged or neutral form inside the bloodstream. That affects absorption, distribution, and stability. And in biochemistry, amino acid side chains change charge depending on pH, which directly affects protein structure and enzyme activity.

    Laboratory chemists also use acidity trends to predict reaction direction. A reaction usually favors formation of the weaker acid and the more stable conjugate base. Knowing which molecule has the smallest pKa often tells you immediately which side of a reaction equilibrium will dominate.

    Even outside professional chemistry, acidity explains why vinegar behaves differently from alcohol, why battery acids are dangerous, and why certain cleaning products react so aggressively.

    Common mistakes students make

    One of the biggest errors is assuming electronegativity alone determines acidity. It matters, but resonance, atom size, hybridization, and induction often matter just as much — sometimes more.

    Another mistake is comparing molecules without drawing the conjugate bases. Students frequently pick the wrong answer because they focus only on the starting molecule instead of the species formed after proton loss.

    And many people memorize isolated pKa numbers without understanding trends. That works temporarily, but it usually fails once unfamiliar molecules appear on exams.

    Here’s the thing: chemistry questions become easier when you stop treating pKa as a fact to memorize and start treating it as a stability problem.

    Closing

    The molecule expected to have the smallest pKa is the one that forms the most stable conjugate base after losing a proton. Resonance stabilization, electronegative atoms, inductive effects, and charge distribution all influence that stability. When comparing acids, focus less on memorized numbers and more on where the electrons go after deprotonation. That approach works far beyond a single homework problem — it becomes a reliable chemistry skill.

  • Any robot mower said to work well in uneven yards

    Any robot mower said to work well in uneven yards

    Learn which robot mower models actually handle uneven lawns well, how terrain affects performance, and what features matter before buying one.

    Fresh stripes on a lawn can hide a surprising amount of chaos underneath. Tree roots lift the soil over time, old drainage trenches sink in strange patterns, and some yards seem flat until a mower wheel suddenly loses traction halfway through a turn. That uneven reality is why so many homeowners start searching for any robot mower said to work well in uneven yards after watching a standard robotic mower get stuck beside a shallow dip.

    The challenge is not just slope angle. Surface consistency matters more than many buyers realize. Wet clay, patchy grass density, exposed roots, and rough transitions between lawn sections all affect how well a robotic mower moves and cuts. And while marketing photos usually show perfect suburban turf, real-world performance depends heavily on wheel grip, chassis design, navigation logic, and how the mower reacts when one wheel briefly lifts off the ground.

    Some models genuinely handle difficult terrain better than others. But the truth is, even the best robotic mower still has physical limits—and understanding those limits matters more than buying the most expensive machine on the shelf.

    Background and context

    Uneven lawns create a different set of mechanical demands than flat grass. A robotic mower on smooth terrain mostly follows predictable movement patterns. Once bumps, shallow holes, and irregular slopes enter the equation, the machine has to constantly adjust wheel torque, balance, and traction. Small design differences suddenly become very noticeable.

    Older robot mowers often struggled because they relied on lightweight frames with small wheels and limited ground clearance. They worked reasonably well on level suburban lawns but became unreliable around drainage edges, exposed roots, or soft ground after rain. Many owners experienced the same cycle: the mower stopped, displayed an error, and required manual rescue every few days.

    Modern premium models improved this by combining larger rear wheels, stronger motors, tilt sensors, and smarter navigation software. Some machines now handle slopes up to 45% or even 70% gradient under ideal conditions. But percentages can be misleading because a rough, uneven 35% incline is often harder than a smooth 50% slope.

    And surface transitions matter too. A robot mower moving from thick grass into compact soil may briefly lose wheel grip before recovering. Better systems anticipate that moment rather than reacting after the mower is already stuck. That difference separates average terrain handling from genuinely reliable terrain handling.

    Battery management also plays a role (especially on larger uneven properties). Frequent wheel corrections consume more energy than straight-line mowing on flat ground, which can shorten runtime noticeably.

    The main substance

    Several robotic mowers are consistently mentioned by homeowners and reviewers when discussing uneven yards. One of the most respected lines is the :contentReference[oaicite:0]{index=0} Automower series, particularly the Automower 435X AWD. The AWD stands for all-wheel drive, and it changes how the mower behaves on difficult terrain. Instead of relying mainly on rear-wheel traction, all four wheels actively assist movement. That becomes extremely useful on wet inclines, rutted ground, or uneven transitions between lawn sections.

    The 435X AWD can reportedly manage slopes near 70% under proper conditions, which is far beyond what entry-level robotic mowers typically handle. But what owners often appreciate most is not the slope rating itself—it is the articulation system. The body flexes independently between front and rear sections, helping the mower maintain wheel contact over uneven surfaces.

    Another commonly recommended option is the :contentReference[oaicite:1]{index=1} Navimow series. Unlike many traditional robotic mowers that depend heavily on boundary wires, newer Navimow models use GPS-assisted positioning and AI-based route planning. On irregular yards, that can reduce the inefficient random movements older mowers are known for.

    And then there is the :contentReference[oaicite:2]{index=2} LUBA series, which gained attention because of its off-road-style wheel setup and aggressive traction design. Some homeowners with rough terrain describe it as closer to a compact utility vehicle than a typical robot mower. The dual-wheel configuration improves stability on uneven ground where narrower robotic mowers sometimes wobble or spin.

    Still, terrain handling is not only about raw traction. Cutting deck placement matters more than many buyers expect. If the deck hangs too low relative to the chassis, the mower may bottom out when crossing raised roots or uneven ridges. Better-designed models position the deck carefully so the mower clears minor obstacles without scalping the grass.

    Navigation software has also improved dramatically over the last few years. Some higher-end models now map lawn zones with enough precision to avoid repeatedly crossing the same rough patch at awkward angles. That reduces wear on both the machine and the lawn itself.

    But there is a caveat many reviews skip over: no robotic mower handles neglected terrain well forever. Deep holes, loose stones, exposed irrigation hardware, and severe washouts still require manual lawn repair. Even premium machines work best when the yard is reasonably maintained.

    One practical observation surprises many first-time buyers. A slightly heavier robot mower often performs better on uneven lawns because the added weight improves traction consistency. Yet too much weight can increase rutting in soft soil after rain. So manufacturers are balancing grip against soil impact all the time.

    And noise levels deserve mention too. Some of the strongest terrain-capable mowers remain impressively quiet compared to petrol-powered alternatives. That matters in dense residential areas where overnight mowing is common.

    Practical angle

    Choosing the right robotic mower for uneven terrain starts with evaluating the lawn honestly rather than emotionally. Many homeowners underestimate how difficult their yard actually is because they are used to walking across it every day.

    Start by identifying the real trouble spots. Small depressions beside patios, roots near mature trees, narrow side passages, and drainage edges usually create more problems than large open slopes. Watching how a manual mower behaves can reveal useful clues. If a push mower frequently lifts, drags, or slips in certain sections, a robot mower will probably struggle there too.

    Wheel design should rank higher on the buying checklist than flashy app features. Wide rubberized wheels with deep tread patterns generally perform better on uneven ground than smooth compact wheels. Ground clearance matters as well—especially if the lawn has exposed roots or shifting soil after heavy rain.

    Boundary setup affects performance more than people expect. A poorly placed boundary wire or virtual boundary can force a robotic mower into awkward turning angles repeatedly. Over time, that creates wear tracks and increases the chance of getting stuck. Better installations guide the mower through smoother movement paths.

    So before spending money, it helps to measure slopes properly rather than estimating visually. A yard that “doesn’t seem very steep” may exceed the mower’s actual safe operating range once wet conditions arrive.

    Maintenance habits also influence long-term success. Cleaning wheels regularly improves traction. Replacing worn blades prevents the mower from overworking in thick grass. And updating firmware can noticeably improve navigation behavior because manufacturers often refine terrain logic after release.

    Realistically, some lawns benefit from a hybrid approach. Owners may allow the robotic mower to handle 90% of the yard while manually trimming difficult edges or highly uneven sections once every couple of weeks. That still reduces overall mowing workload dramatically.

    What to know going forward

    Robot mower technology is moving quickly toward smarter terrain adaptation. GPS-guided mowing, machine vision, and AI-assisted route planning are already reducing many of the frustrations early robotic mowers became known for. And battery efficiency keeps improving, which helps machines maintain stronger wheel torque on difficult ground without sacrificing runtime.

    Wire-free systems will likely become far more common over the next few years, particularly for complicated lawns with multiple zones and irregular layouts. That shift may make installation easier for homeowners who previously avoided robotic mowing because of boundary wire complexity.

    But uneven terrain will always remain one of the hardest environments for autonomous mowing. Physics still matters. Wet grass reduces traction. Loose soil shifts under weight. Sudden dips can trap wheels regardless of software quality.

    The best approach is to treat robotic mowing as part landscaping tool, part outdoor robotics system. Buyers who understand their lawn conditions realistically usually end up much happier with the results.

    Closing

    A robotic mower can work remarkably well on uneven yards when the machine matches the terrain instead of fighting against it. Models from companies like :contentReference[oaicite:3]{index=3}, :contentReference[oaicite:4]{index=4}, and :contentReference[oaicite:5]{index=5} have pushed the category far beyond the fragile early designs many people still remember.

    Before buying, spend time studying the lawn itself. Measure slopes, inspect rough patches, and pay attention to how water moves through the yard after rain. Those details will tell you more about which robotic mower will succeed than any marketing slogan ever could.

  • Broad-spectrum sunscreen with an spf of 30 or higher

    Broad-spectrum sunscreen with an spf of 30 or higher

    There’s a quiet kind of damage that builds over years—no pain, no immediate sign, just small changes accumulating under the surface. Skin doesn’t complain loudly when exposed to sunlight; it adapts, compensates, and then eventually shows the cost. That’s where broad-spectrum sunscreen with an SPF of 30 or higher steps in, not as a cosmetic afterthought but as a daily safeguard. The real question behind most searches isn’t what sunscreen does, but whether it actually makes a measurable difference in everyday life. And it does—more than most people realize.

    Background and context

    Sunlight carries more than warmth. Ultraviolet radiation reaches the skin in two primary forms: UVA and UVB. UVB is the one most people associate with sunburn, the immediate redness after too much exposure. UVA, on the other hand, penetrates deeper into the skin and contributes to premature aging—wrinkles, loss of elasticity, and uneven pigmentation.

    And here’s where the term “broad-spectrum” matters. It signals protection against both UVA and UVB rays, not just one. Without that dual coverage, sunscreen only solves half the problem.

    SPF, or Sun Protection Factor, measures how well a product protects against UVB rays. An SPF of 30 blocks about 97% of UVB radiation, while higher numbers increase that percentage slightly—but not dramatically. The difference between SPF 30 and SPF 50 is smaller than most assume.

    But the number alone doesn’t tell the whole story. Application thickness, frequency, and even sweating can influence effectiveness (a detail often overlooked in daily use). Sunscreen isn’t a one-time shield—it’s a temporary layer that needs attention.

    The main substance

    Dermatological research consistently points to daily sunscreen use as one of the most effective ways to reduce long-term skin damage. Studies published in journals like the Journal of Clinical Oncology have shown a clear link between consistent sunscreen use and reduced risk of certain skin cancers, including melanoma.

    And not all sunscreens are created equal. Mineral sunscreens, typically containing zinc oxide or titanium dioxide, sit on the skin’s surface and reflect UV radiation. Chemical sunscreens, with ingredients like avobenzone or octinoxate, absorb UV rays and convert them into heat.

    Each has trade-offs. Mineral formulas tend to be gentler for sensitive skin but may leave a visible white cast. Chemical options blend more easily but can irritate some users, especially around the eyes.

    So choosing the right sunscreen becomes less about brand and more about formulation, skin type, and environment. Someone with oily skin might prefer a lightweight gel-based sunscreen, while dry skin often benefits from cream-based formulas with added moisturizers.

    And then there’s reapplication. Most people apply sunscreen once in the morning and forget about it. Realistically, that’s not enough. Sunscreen breaks down with time, sweat, and exposure, which means reapplying every two hours—especially outdoors—is necessary for consistent protection.

    The truth is, sunscreen’s effectiveness depends more on how it’s used than the label itself. Even the highest SPF product won’t perform well if applied too thinly or inconsistently.

    Practical angle

    Daily routines often determine whether sunscreen becomes a habit or an occasional afterthought. And habits matter more than intention. Applying sunscreen after moisturizer, before makeup, and carrying a travel-size bottle for reapplication can make a noticeable difference.

    But environment plays a role too. Urban settings still expose skin to UV rays through windows and reflective surfaces. Beach or outdoor conditions increase exposure dramatically, requiring more frequent application and water-resistant formulations.

    Or consider work patterns. Someone commuting during peak sunlight hours faces a different exposure level than someone indoors all day—though neither is completely protected without sunscreen.

    And for children or individuals with sensitive skin, choosing fragrance-free, hypoallergenic options can reduce irritation while maintaining protection.

    There’s also the question of layering. Makeup products with SPF are helpful, but they rarely provide enough coverage on their own. They work best as a supplement rather than a replacement.

    Consistency, not perfection, drives results here. Missing a day won’t undo everything, but long gaps in protection gradually accumulate effects that become visible over time.

    What to know going forward

    Protection isn’t just about avoiding sunburn. It’s about reducing cumulative damage that builds slowly and shows up years later. Broad-spectrum coverage ensures both surface-level and deeper skin layers are protected.

    And SPF 30 or higher strikes a practical balance—strong enough for daily use without creating a false sense of invincibility that sometimes comes with higher numbers.

    But no sunscreen offers complete protection. Shade, clothing, and timing still matter, especially during peak sunlight hours.

    Understanding how sunscreen interacts with real-life conditions—sweat, water, time—makes it more effective than simply choosing a higher SPF.

    Closing

    Skin protection doesn’t demand complicated routines, just consistent ones. A simple step repeated daily often outperforms occasional intensive care.

    So the next time you step out, treat sunscreen less like a seasonal product and more like a daily essential. Start with a formula that suits your skin, apply it properly, and build the habit around your routine—it’s one of the few small actions that pays off quietly but significantly over time.

  • 8th class physics question paper 2018 2019

    8th class physics question paper 2018 2019

    Marksheets don’t show the struggle behind understanding why a bulb glows or why a stone sinks. But question papers do. They quietly reveal patterns—what examiners expect, where students hesitate, and which concepts are often misunderstood. The 8th class physics question paper 2018 2019 is not just a past paper; it is a map of how physics is tested at this level. By the end of this article, you will not only know what types of questions appear, but also understand the concepts deeply enough to solve them confidently.

    Core concept and definition

    What these question papers really test is not memorisation, but conceptual clarity. Physics in class 8 typically covers topics like force, pressure, friction, light, sound, and basic electricity. These are not isolated chapters—they are interconnected ideas that describe how the physical world behaves. A question paper from 2018 or 2019 reflects how these ideas are framed into problems.

    Force, for instance, is described as a push or pull that can change the shape, direction, or speed of an object. Pressure is force applied per unit area, written as Pressure = Force / Area. And this simple relation appears again and again in questions—sometimes directly, sometimes hidden in real-life scenarios (like why sharp knives cut better).

    But here’s the thing: examiners rarely ask definitions alone. They combine definitions with application. A question might ask you to define friction and then explain why it is both useful and harmful. This dual nature of questions means understanding must go beyond textbook lines.

    And concepts like light reflection or sound vibrations are often tested through diagrams. So understanding is visual as well as theoretical.

    Deep explanation with examples

    Let’s break down how a typical question from these papers works—step by step, the way you would actually solve it in an exam.

    Consider a common question: “Calculate the pressure exerted when a force of 50 N acts on an area of 10 m².”

    Start with the formula: Pressure = Force / Area.

    Substitute values: Pressure = 50 / 10.

    So the answer is 5 N/m².

    Short. Direct. But many students lose marks here—not because they don’t know the formula, but because they forget units or misplace values. And units matter. Always.

    Now take a slightly more layered question: “Why do camels have broad feet?”

    This is not a calculation question. It tests concept application. A camel’s broad feet increase surface area. And when area increases, pressure decreases (since Pressure = Force / Area). Lower pressure prevents the camel from sinking into sand.

    See how the same formula appears again, but in a completely different form.

    Another example involves friction. Suppose a question asks: “Name one method to increase friction and one to decrease it.”

    Increasing friction can be done by making surfaces rough. Decreasing friction can be done by lubrication. But the deeper idea is this: friction depends on surface texture and interaction between surfaces (not just weight, which many assume).

    Now consider light. A question might ask you to draw a ray diagram for reflection from a plane mirror. The law of reflection states: angle of incidence = angle of reflection. If the incident ray hits at 30°, it reflects at 30°. Simple in theory, but diagrams must be neat and labelled properly.

    And electricity questions often involve circuits. A typical question: “What happens when a switch is open?” The circuit is incomplete, so current does not flow. Bulb stays off. But if the switch is closed, the circuit completes and current flows.

    Or sound: “Why does sound need a medium?” Because sound travels through vibrations of particles. No particles, no transmission. That is why sound cannot travel in vacuum.

    But realistically, the toughest part is not knowing these facts—it is recognising which concept a question is testing. That skill improves only with practice of actual papers like those from 2018 and 2019.

    Real-world applications

    Physics at this level may feel basic, but it explains everyday experiences. And that is exactly why these questions appear in exams—they connect theory with life.

    Pressure explains why school bags with wide straps feel more comfortable. Friction explains why brakes stop a bicycle. Light explains how mirrors work at home and in vehicles. Sound explains how we hear and communicate.

    And in exams, these real-life links show up as short answer questions. A question might describe a situation and ask you to explain it using a concept. Not a definition, not a formula—just understanding.

    Or take electricity. The concept of circuits is directly linked to household wiring. A fused bulb, a broken wire, or a switch—all are practical examples students already see.

    So the question paper is not testing abstract knowledge. It is testing whether you can explain the world around you using physics.

    Common mistakes and misconceptions

    Students often lose marks in predictable ways. And once you notice these patterns, avoiding them becomes much easier.

    One common mistake is confusing force with pressure. Force is measured in Newtons, pressure in N/m². Mixing them up leads to incorrect answers—even if the idea is partially right.

    Another issue is ignoring units. Writing “5” instead of “5 N/m²” is incomplete. Exams reward precision.

    Then there is friction. Many students think friction is always harmful. But it is also necessary—without it, walking would be impossible. Questions often test this dual nature.

    And diagrams—this is where marks quietly slip away. Poorly labelled diagrams, missing arrows, or incorrect angles reduce marks even when the concept is correct.

    Or sound. A frequent misconception is that sound travels faster in air than solids. It is actually the opposite. Sound travels faster in solids because particles are closer together.

    There is also over-reliance on memorisation. Students remember definitions but struggle with application. Question papers from 2018 and 2019 clearly show that application-based questions are common.

    (One limitation worth acknowledging: practising only past papers is not enough. They show patterns, but concepts must still be studied from textbooks.)

    Closing

    Understanding the 8th class physics question paper 2018 2019 is really about understanding how physics itself is asked, not just what is asked. Patterns repeat. Concepts reappear in different forms. And confidence builds when you recognise them quickly.

    So take one paper, solve it fully, and then analyse every mistake. Not just what went wrong—but why. That single habit will improve your accuracy more than solving ten papers blindly.

    Next, focus on diagrams and unit-based questions. They are small areas—but they carry marks you should not be losing.

  • How to Get Fingernail Polish Out of Carpet Without Damaging Fibers

    How to Get Fingernail Polish Out of Carpet Without Damaging Fibers

    A tiny spill can turn into a permanent eyesore faster than you expect. Bright polish sinks into carpet fibers almost instantly, and once it dries, it feels like it’s locked in for good. Knowing how can you get fingernail polish out of carpet isn’t about scrubbing harder — it’s about using the right method at the right time. By the end of this guide, you’ll know exactly how to lift fresh or dried polish, what products actually work, and how to avoid spreading the stain further.

    Before you start

    Act quickly if the polish is still wet. Timing changes everything here — fresh spills are much easier to remove than dried ones. But even dried stains can be lifted with the right approach.

    Gather a few basics: paper towels or a clean cloth, rubbing alcohol or non-acetone nail polish remover, mild dish soap, and cold water. Avoid colored cloths (they can transfer dye), and always test any cleaning solution on a hidden area first.

    And check your carpet type. Synthetic fibers like nylon or polyester are more forgiving, while wool or delicate blends need extra caution (harsh chemicals can damage them quickly). This small step prevents bigger problems later.

    Step-by-step instructions

    1. Blot immediately if the polish is wet. Press gently with a paper towel to absorb as much as possible. Don’t rub — rubbing pushes the polish deeper into the fibers.

    2. Scrape off excess if dried. Use a dull knife or spoon to lift hardened polish carefully. This reduces how much stain you need to dissolve later.

    3. Apply a small amount of non-acetone remover or rubbing alcohol. Dab it onto a cloth first, then onto the stain. This controls how much liquid touches the carpet and prevents over-saturation.

    4. Blot, don’t scrub. Press the cloth repeatedly to lift the color. You’ll see the stain transfer gradually — this is exactly what you want.

    5. Repeat the process patiently. And this is where most people rush. Multiple light applications work better than one heavy soak.

    6. Rinse with cold water. Dab the area with a damp cloth to remove any remaining cleaner. Leftover residue can attract dirt later.

    7. Apply mild soap solution if needed. For stubborn stains, a drop of dish soap mixed with water helps break down remaining polish.

    8. Dry the area properly. Blot with a dry towel and let it air dry completely. So avoid walking on it while damp — this prevents flattening or re-staining.

    Common mistakes

    Rubbing the stain is the biggest mistake. It feels natural, but it spreads polish sideways and deeper into the carpet.

    Using too much liquid is another issue. The truth is, over-saturating the carpet can push the stain into the backing, making it harder to remove and slower to dry.

    Skipping the patch test is risky. But some removers can discolor or weaken certain carpets, especially natural fibers.

    And using acetone blindly can backfire. While effective, it can damage carpet fibers or remove dye, leaving a light patch behind.

    Tips to do it better

    Work from the outside of the stain inward. This keeps the polish from spreading and helps contain the damage.

    Use white cloths only. And this avoids accidental color transfer, which can make the stain worse than before.

    If the stain is stubborn, switch between alcohol and mild soap rather than repeating the same step endlessly. This layered approach works better on set stains.

    Here’s the thing — patience beats force every time with carpet cleaning.

    Closing

    Getting nail polish out of carpet takes care and the right sequence, not brute effort. Follow the steps, avoid rushing, and focus on gentle lifting rather than aggressive cleaning. Start with blotting, move carefully through treatment, and let the area dry fully. Done properly, even stubborn stains can fade away without leaving damage behind.

  • Write and solve the equation for each model

    Write and solve the equation for each model

    Introduction

    Patterns hide in plain sight. A growing savings balance, a straight road on a graph, even the way a tank fills over time — each can be described by a mathematical model. When you write and solve the equation for each model, you’re not just doing algebra; you’re translating real situations into something precise and predictable.

    This skill shows up everywhere: school exams, business forecasts, physics problems, and everyday reasoning. By the end of this article, you’ll understand how to turn a model into an equation, solve it correctly, and—just as importantly—recognize when something has gone wrong.

    Core concept and definition

    Every model represents a relationship between quantities. That relationship can be written as an equation, which is a statement showing two expressions are equal. The goal is simple: express the situation mathematically, then solve for the unknown.

    But the interesting part is choosing the right form. Linear models follow the structure y = mx + c, where m is the rate of change and c is the starting value. Quadratic models look like y = ax² + bx + c, often appearing when growth is not constant. And exponential models take the form y = ab^x, describing rapid increase or decay (like population growth or radioactive decay).

    And each model carries meaning — the numbers are not random symbols. They represent rates, starting points, or scaling factors tied directly to the situation. Misreading that meaning is where most errors begin.

    So writing an equation is not just substitution. It is interpretation.

    Deep explanation with examples

    Let’s start with a simple linear model. Suppose a taxi charges a base fare of 3 units plus 2 units per kilometer. The model becomes: Cost = 2x + 3, where x is distance.

    If you travel 5 km, substitute x = 5:

    Cost = 2(5) + 3 = 10 + 3 = 13

    But here’s where students slip — solving goes both ways. If the total cost is 17, then:

    17 = 2x + 3

    Subtract 3 from both sides: 14 = 2x

    Divide by 2: x = 7 km

    That’s the full cycle: write, substitute, solve.

    Now consider a quadratic model. A ball is thrown upward, and its height is given by h = -5t² + 20t. To find when it hits the ground, set h = 0:

    0 = -5t² + 20t

    Factor: 0 = -5t(t – 4)

    So t = 0 or t = 4

    Time zero is the start. The ball hits the ground at 4 seconds.

    But notice something subtle (and often missed): both solutions are mathematically correct, yet only one is meaningful in context. That’s where interpretation matters.

    Finally, take an exponential model. A bacteria culture doubles every hour, starting with 100 cells. The equation is:

    N = 100(2^t)

    After 3 hours:

    N = 100(2^3) = 100 × 8 = 800

    So the model doesn’t just describe growth — it predicts future values precisely.

    Or reverse it. If the population reaches 1600:

    1600 = 100(2^t)

    Divide both sides: 16 = 2^t

    t = 4 hours

    Here’s the thing: solving equations is not one technique. It changes depending on the model — factoring, isolating variables, or using logarithms for exponential forms.

    Real-world applications

    Equations built from models are everywhere, even when you don’t notice them. Businesses rely on linear models to estimate costs and profits. Engineers use quadratic equations to calculate trajectories and forces. And scientists depend on exponential equations to study growth and decay processes.

    In exams, these problems often appear as word problems — the kind students tend to rush. But those questions are testing something deeper than algebra. They’re testing whether you can translate language into structure.

    And outside academics, the same thinking applies. Budget planning, loan repayments, or tracking fitness progress all rely on forming and solving equations. The model may not be written explicitly, but it’s there.

    So when you learn to write and solve the equation for each model, you’re learning how to reason quantitatively about real situations — not just pass a test.

    Common mistakes and misconceptions

    One of the biggest mistakes is choosing the wrong model. Students often assume every situation is linear, even when the rate clearly changes. That leads to equations that look correct but give wrong answers.

    Another issue is misinterpreting variables. For example, confusing the starting value with the rate of change — especially in equations like y = mx + c. And once that confusion enters, every step after becomes unreliable.

    But there’s also a quieter problem. Many solve equations mechanically without checking if the answer makes sense. A negative time, a distance of zero when movement is described — these are red flags.

    And then there’s algebra itself. Skipping steps, mishandling signs, or forgetting to apply operations to both sides equally. Small slips, big consequences.

    Realistically, the hardest part is not solving. It’s setting up the equation correctly in the first place.

    Closing

    Understanding how to write and solve the equation for each model opens the door to much deeper mathematical thinking. The next step is practice — not random problems, but carefully chosen ones where you must decide which model applies and justify it.

    Try this: take a real situation around you, like tracking daily expenses or travel time, and turn it into an equation. Solve it. Check if the answer makes sense. That simple habit builds accuracy faster than memorising formulas ever will.

  • If xy Is a Solution to the Equation Above — Clear Concept, Step-by-Step Understanding

    If xy Is a Solution to the Equation Above — Clear Concept, Step-by-Step Understanding

    I still remember staring at a math problem that said something like, “if xy is a solution to the equation above…” and just freezing. Not because it was hard, but because it felt vague. What exactly was I supposed to do with that information?

    Maybe you’ve had that same moment—reading the question twice, then a third time, hoping it suddenly makes sense. Truth is, questions like this aren’t about complex math. They’re about understanding relationships. And once that clicks, everything gets easier.

    So let’s unpack this properly. Not like a textbook, but like someone sitting next to you, explaining what’s really going on behind that phrase “if xy is a solution to the equation above.” Because once you see the pattern, you won’t panic next time—you’ll actually feel confident.

    What Does “xy Is a Solution” Really Mean?

    At first glance, it sounds simple. But there’s a small twist here that confuses many people.

    When a question says “xy is a solution,” it doesn’t always mean x and y separately solve the equation. Instead, it often means their product—or sometimes the ordered pair (x, y)—fits into the equation and makes it true.

    I’ve seen students assume it means x = something and y = something independently. But that’s not always the case. Sometimes the equation is built in such a way that only their combined relationship matters.

    So pause for a second and ask yourself—are we dealing with multiplication, or a coordinate pair? That single question can save you a lot of confusion.

    And honestly, this is where many mistakes begin. Not because of lack of skill, but because of rushing through the wording.

    Why These Questions Feel Trickier Than They Actually Are

    Here’s the thing—these problems are less about calculation and more about interpretation.

    In my experience, students often overthink the algebra and underthink the language. They jump straight into solving without understanding what “solution” even refers to in that context.

    Let’s say you have an equation like x + y = 10. If someone says xy is a solution, what does that mean? Are we plugging xy into the equation? Or are we checking if specific values of x and y satisfy it?

    That small ambiguity creates mental friction. And once your brain gets stuck there, even simple algebra feels messy.

    But once you slow down and reframe the problem—almost like translating it into plain English—it starts to feel manageable again.

    How to Approach These Questions Step by Step

    Let me walk you through how I personally handle these. Not a rigid method, but something that works consistently.

    First, identify what kind of equation you’re dealing with. Is it linear, quadratic, or something involving products like xy directly? That changes everything.

    Then, interpret what “xy” represents in that specific context. If the equation includes terms like xy, then you’re likely working with multiplication. If not, it might refer to a pair of values.

    Next—and this is important—substitute carefully. Don’t rush. I’ve made this mistake more times than I’d like to admit. One small substitution error, and the whole solution goes off track.

    And finally, check your result. Does it actually satisfy the original equation? Not your rearranged version—the original one.

    Sounds basic, I know. But these fundamentals are what separate consistent answers from lucky guesses.

    Real-World Thinking That Makes This Easier

    Let me share something that helped me personally.

    Instead of thinking of x and y as abstract variables, I started imagining them as real quantities. Like price and quantity, or speed and time. Suddenly, the idea of “xy” as a product felt more intuitive.

    For example, if x is price per item and y is number of items, then xy is total cost. That’s something your brain understands instantly.

    And when you bring that mindset into equations, things feel less mechanical. You’re not just solving—you’re interpreting relationships.

    Honestly, this shift from abstract to practical thinking makes a huge difference. It’s not taught enough, but it works.

    Have you ever noticed how some problems feel easy when you relate them to real life? That’s not a coincidence.

    Common Mistakes You Should Watch Out For

    One mistake I see often is assuming too much. People see “xy” and immediately treat it as a fixed number without verifying what the equation actually requires.

    Another common issue is ignoring the structure of the equation. If the equation doesn’t even include xy, then forcing it into the solution process can create unnecessary confusion.

    And then there’s careless algebra. Rushing through simplification, skipping steps—it happens to everyone. But in these problems, small errors compound quickly.

    Also, some students forget to check whether multiple solutions exist. They stop at the first valid answer and move on. But sometimes, the question expects a broader perspective.

    And honestly, one subtle mistake is not questioning the question itself. If something feels unclear, pause and rethink. That moment of hesitation often leads to clarity.

    Closing Thoughts — Build Understanding, Not Just Answers

    If there’s one thing I’d say, it’s this—don’t treat “if xy is a solution to the equation above” as a tricky phrase. Treat it as a clue. It’s pointing you toward a relationship you need to understand, not just calculate.

    Start slow. Read carefully. Interpret before solving.

    Because once you truly understand what the question is asking, the math becomes surprisingly straightforward.

    And next time you see a similar problem, you won’t feel stuck—you’ll know exactly where to begin.